As paper trails turned digital, person of interest investigations have become a complex game of cat-and-mouse. It is becoming easier and easier for criminals and malicious actors to hide behind fake online identities. Navigating such a digital landscape can become challenging for law enforcement agencies and criminal investigators alike.
On the other hand, as many aspects of our lives depend on or exist only on the internet, we might be sharing information and details of our personal identities and private life without knowing. These digital footprints might seem and can often be harmless. In certain cases, however, they can also be points of vulnerability.
It is important for investigators to have effective methods and tools for mapping digital footprints—either for a criminal case or to protect a person of interest from external threats.
With Maltego, investigators can quickly and easily link seemingly disparate leads and build a comprehensive map of a target person’s digital footprint. Integrated with a variety of OSINT, social intelligence, and identity data sources, Maltego is the perfect tool to quickly obtain and analyze the digital presence of a person of interest.
In this tutorial, we will demonstrate how to conduct a person of interest investigation using OSINT in Maltego. We will start with the names of two public individuals and pivot into more personal identifiers, including social media accounts, private phone numbers, a company name, personal email addresses, and the network infrastructure of websites connected to them.
Watch the video now, or follow along to read the documented tutorial and download your cheat sheet below.
Table of Contents 🔗︎
Conducting a Personal Recon Investigation 🔗︎
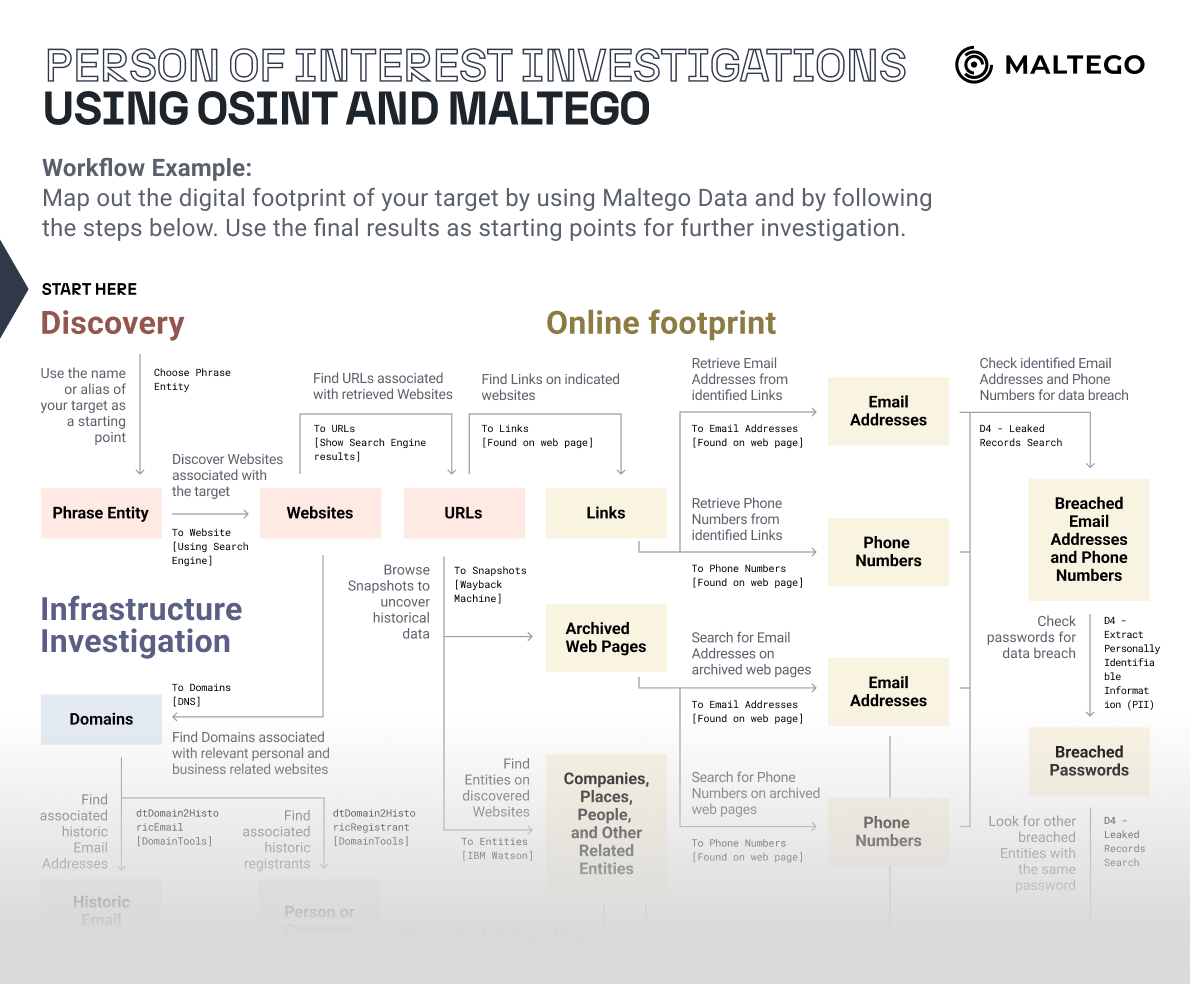
For this tutorial article, we’ll explore the digital footprint of two individuals, Aina and Marc Clotet, by using Maltego Data and by following the six steps below:

First, we’ll look for official information about the targets, such as their location and personal websites. Next, we will trace the digital trail left by our targets and then delve into their official and private social media profiles, gathering profile images and insights into their closed networks.
After that, we’ll explore a company with which both targets appear to be affiliated. Next, we’ll map the infrastructure of their websites in search of more detailed information, such as their personal email addresses. Finally, in the last step, we will utilize our findings to search for phone numbers associated with the targets.
If you would like to reproduce the steps in your Maltego or get an extensive overview of the investigation, download the workflow cheat sheet now!
Step 1: Discovery 🔗︎
Our targets are actors who also happen to be siblings: Aina and Marc Clotet. We will begin our investigation by identifying some basic information and connections.
First, we open a new graph in Maltego, paste the names of the actors as Phrase Entities, and run the To Search Page Titles [Wikipedia EN] to discover the official Wikipedia pages for both actors.
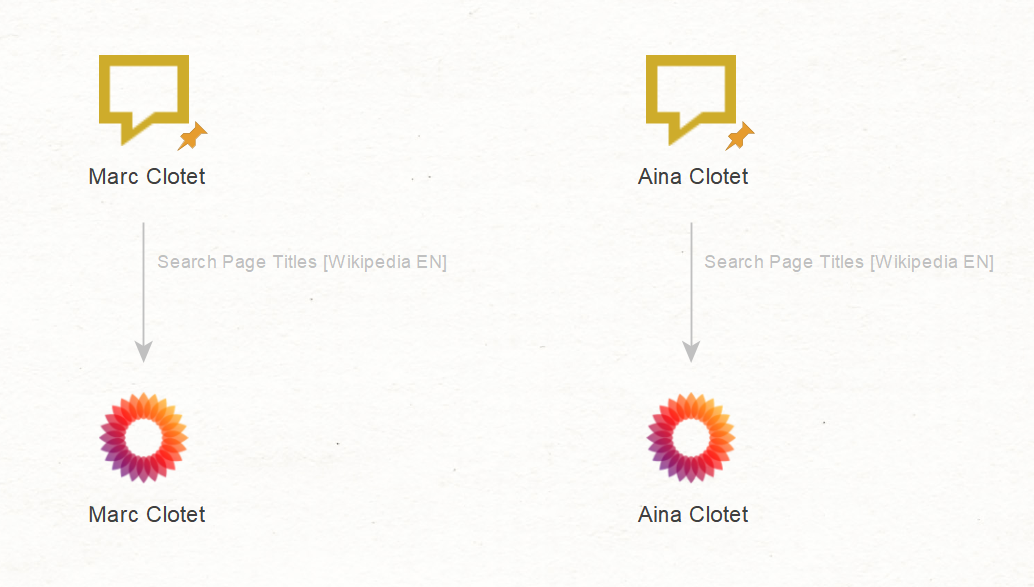
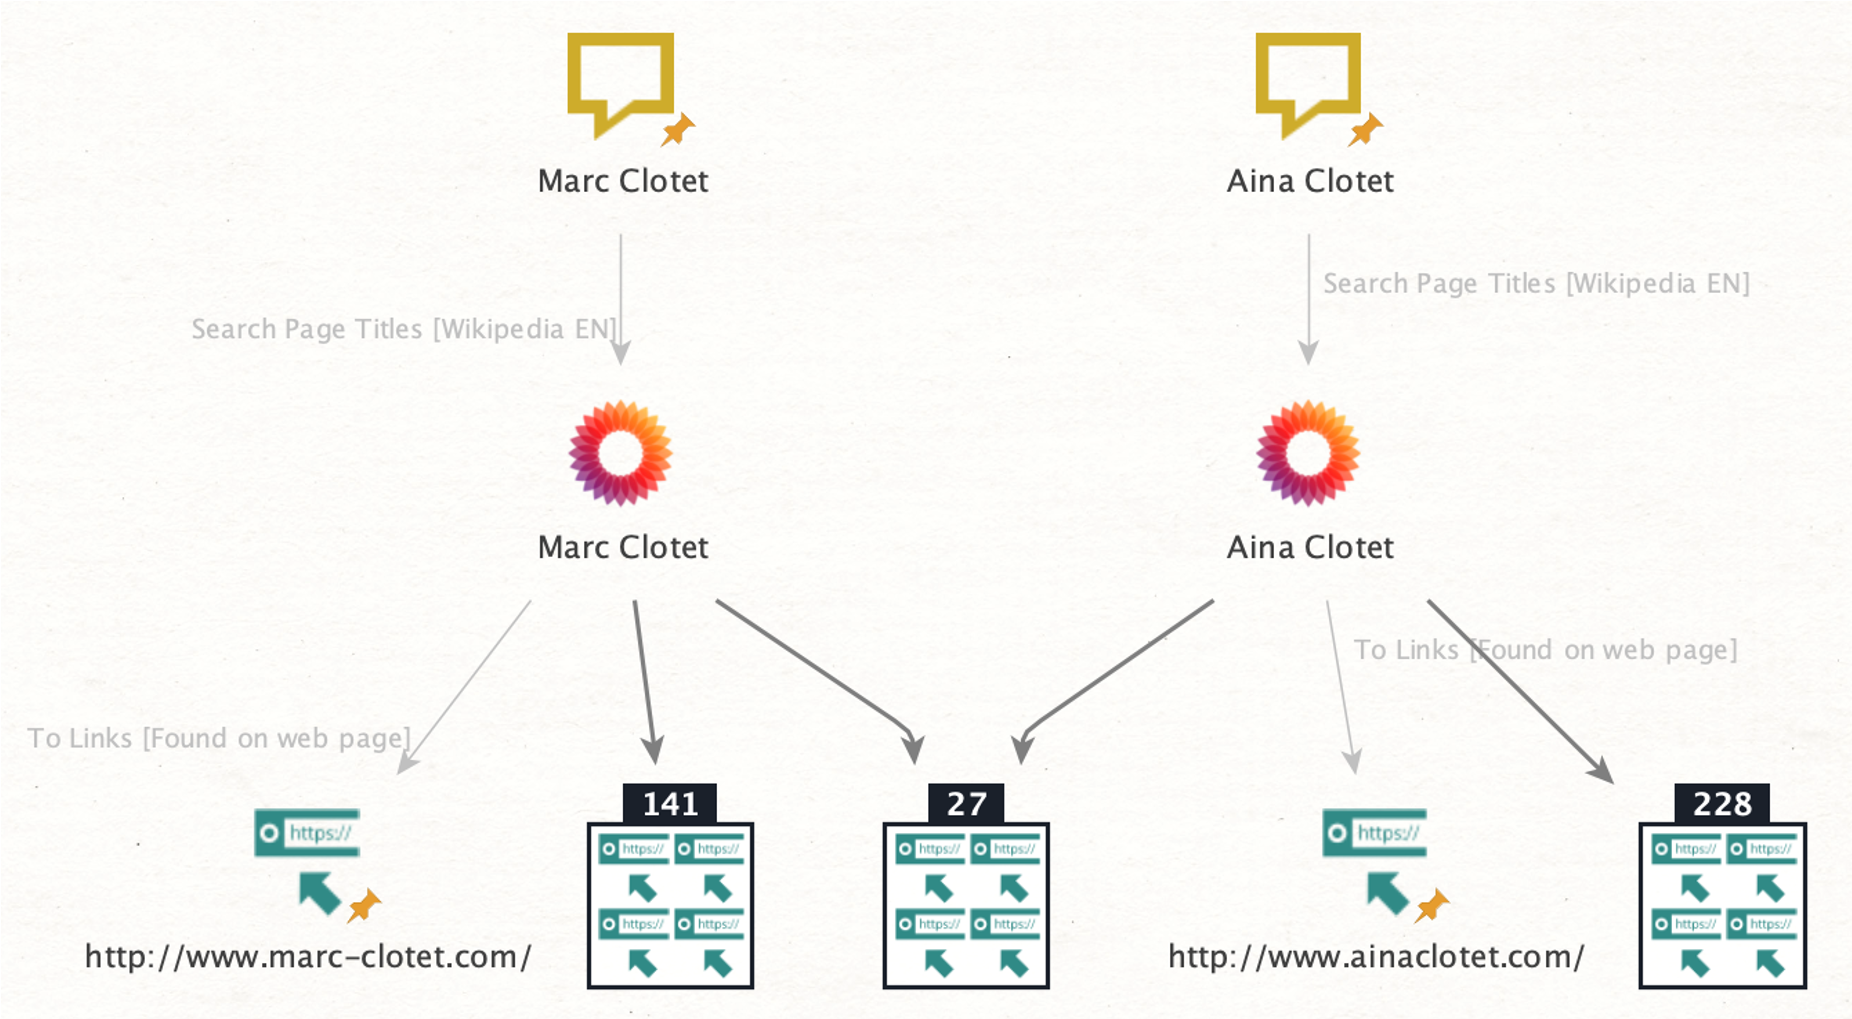
From there, we can run the To Links [found on web page] Transform to get a list of websites found on their respective Wikipedia pages. We will also get an overview of which websites are mentioned on both of their Wikipedia pages.
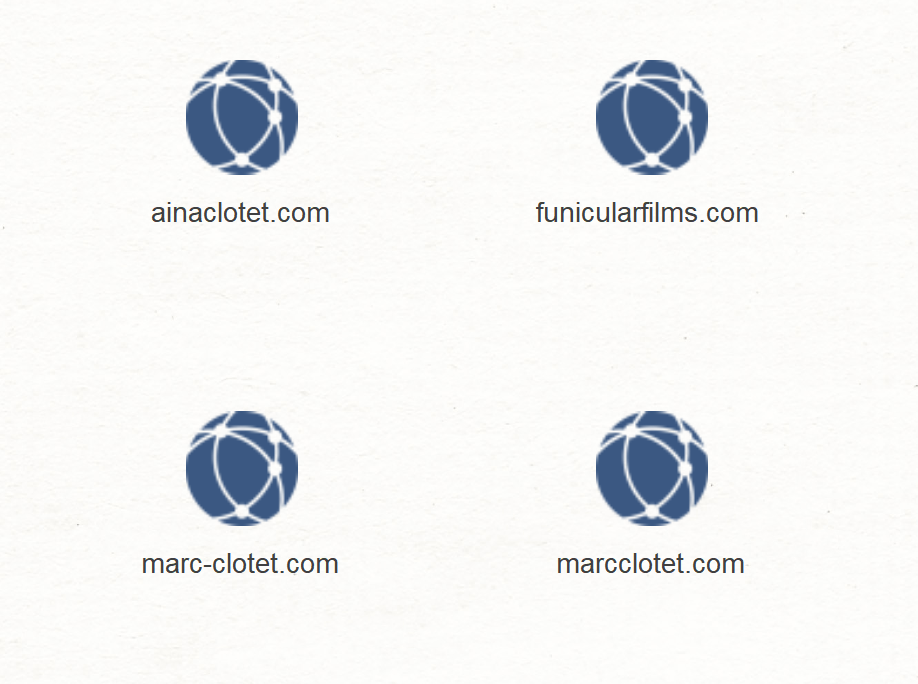
Two results are particularly relevant as they lead to the official websites of Aina and Marc Clotet: “www.ainaclotet[.]com” and “www.marcclotet[.]com.” They will serve as starting points in the later stages of this investigation.
Apart from searching for websites, we can also extract other relevant information mentioned on the official Wikipedia pages, such as locations and names.
To do that, we will run the To Entities [IBM Watson] Transform.
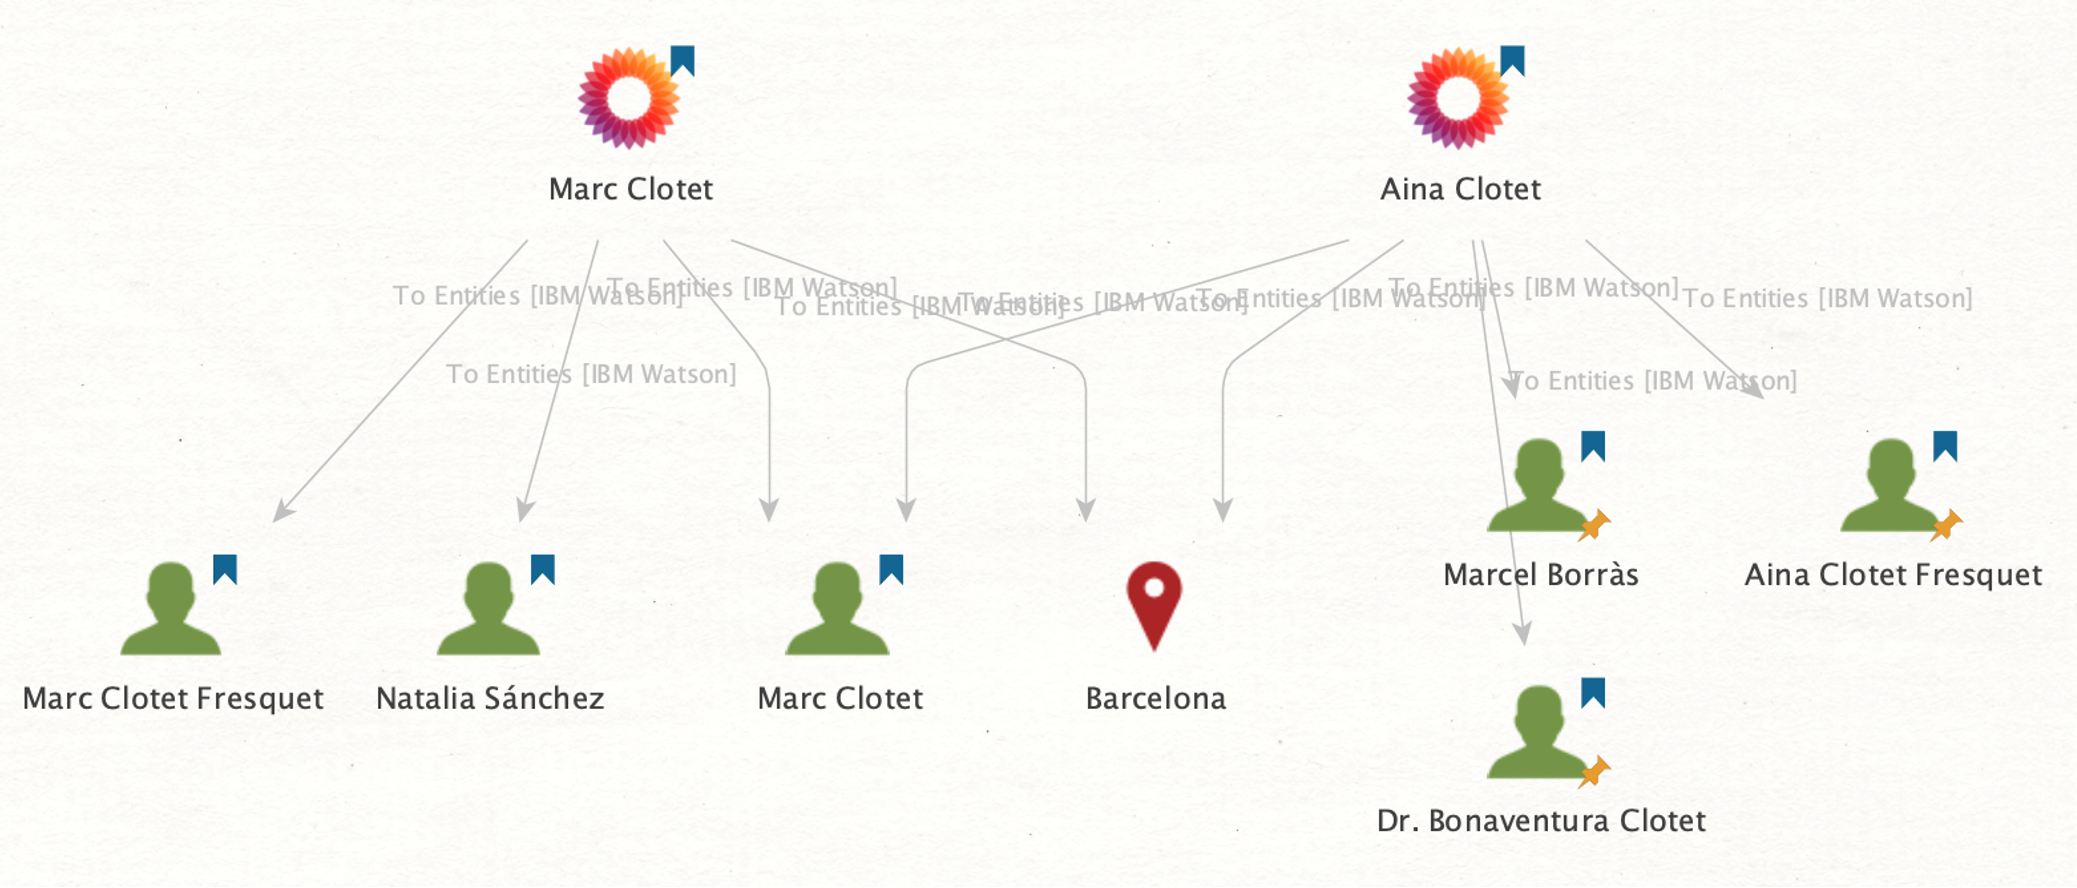
In doing so, we retrieved a list of names potentially linked to our targets and a location shared by both actors (Barcelona, Spain).
Step 2: Online Footprint 🔗︎
We will start our next step by dragging a Phrase Entity into a new graph and adding the actors’ names in inverted commas to limit the search results down to exact matching. This is a common search dorking technique to increase the relevance of a web search.
Our goal is to find websites associated with our targets using the Maltego Standard Transforms.
We do this by first running the To Website [using Search Engine], then the To URLs [show Search Engine results], and finally the To Links [Found on web page] Transforms.
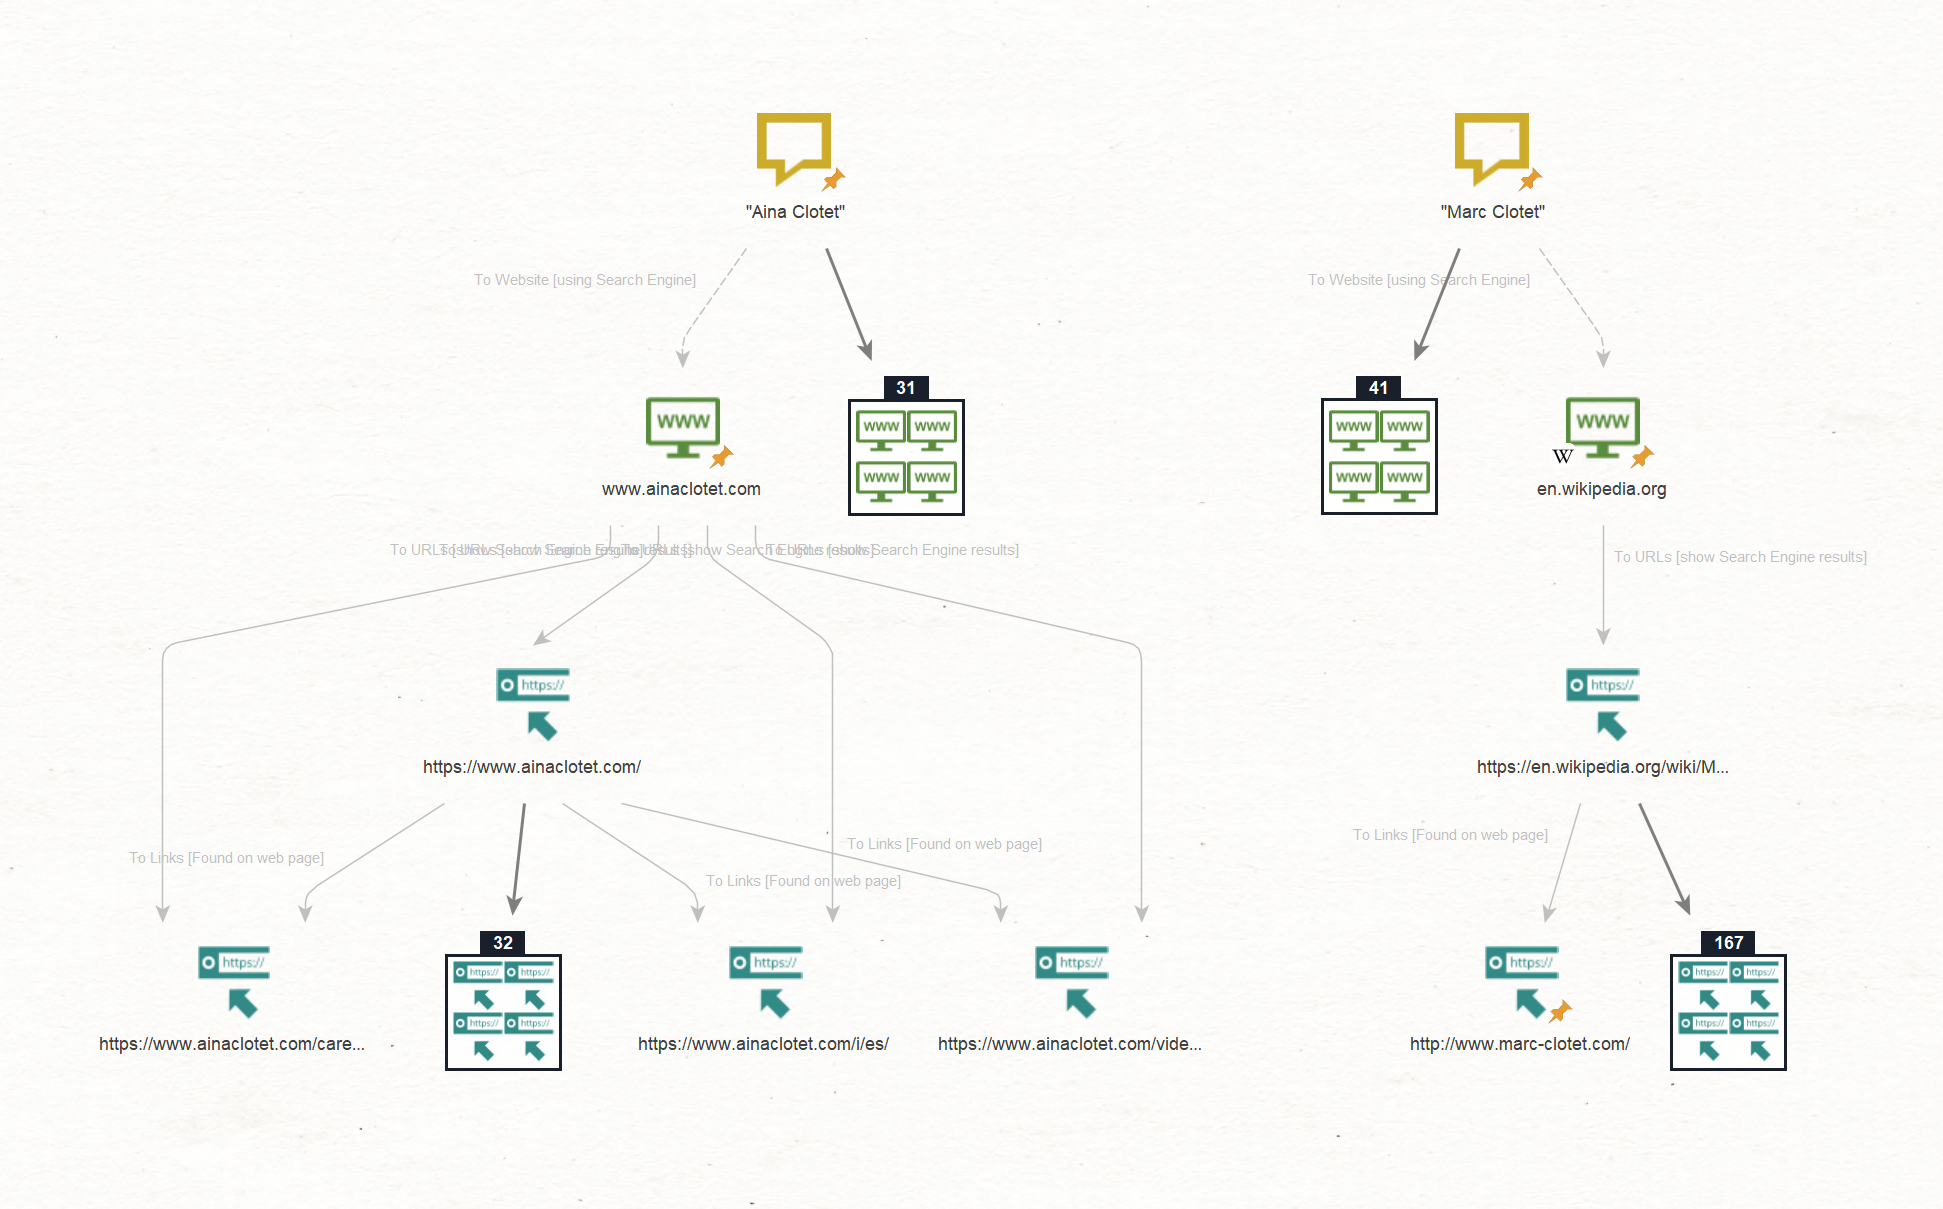
These Transforms return a list of websites where the names “Aina Clotet” or “Marc Clotet” are mentioned. They include documenting websites such as Wikipedia, as well as a personal website we also saw in the first step, namely “ainaclotet[.]com.”
We will now try to extract contact information that is usually embedded in the website footer. It can serve as a starting point to investigate professional contacts of our target, aiding in profiling and potentially uncovering connections to their secondary or hidden profiles.
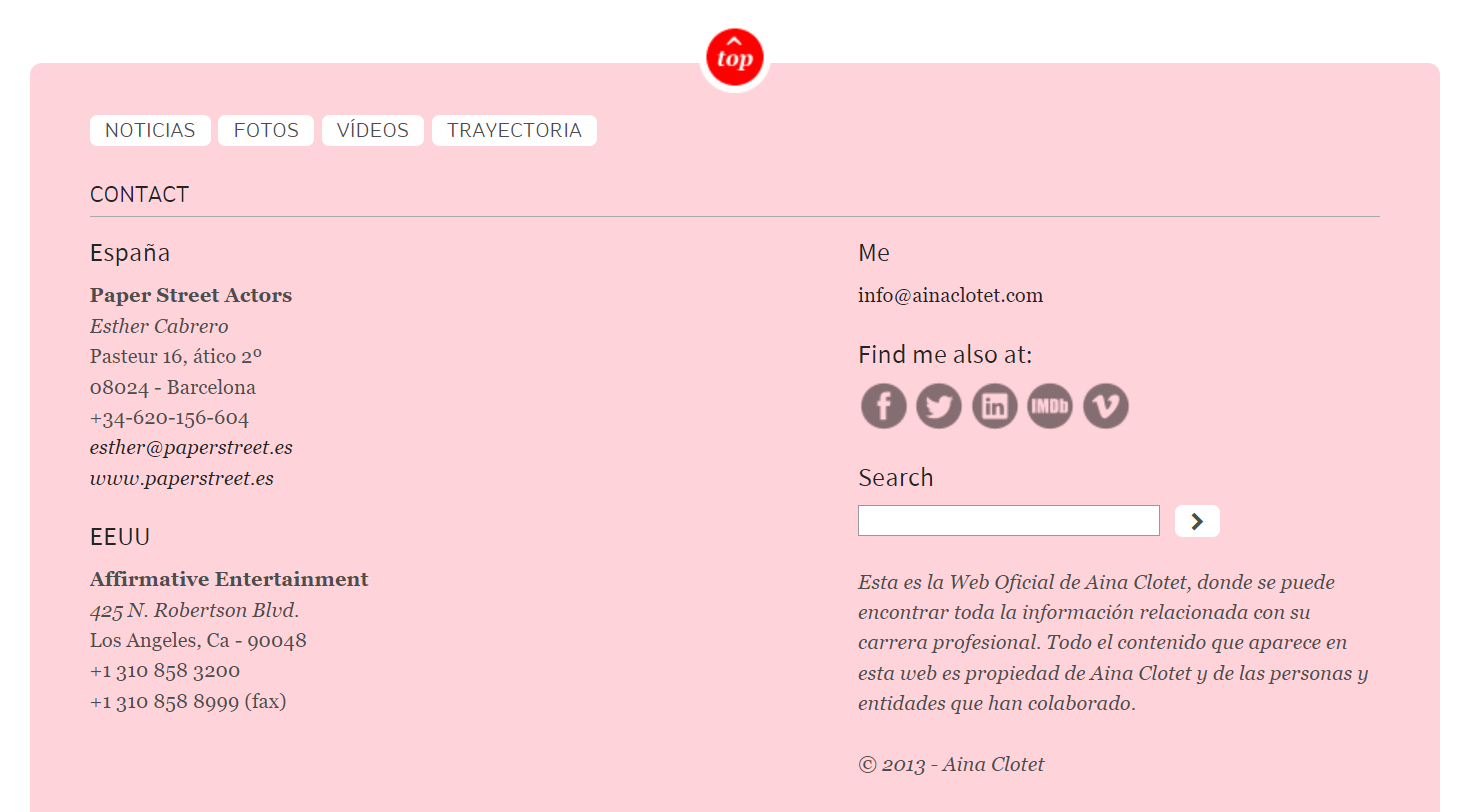
As an example, we will use the identified Entity “ainaclotet[.]com/i/es/” and run the To Email Addresses [found on webpage], and To Phone Numbers [found on webpage] Transforms.

Maltego returned a collection of Entities pointing to email addresses (such as “esther@paperstreet[.]es”) and phone numbers that are likely linked to talent managers.
To verify the retrieved data, we can double-click on the Entity on which we ran the Transforms and view the page by clicking on “Open all URLs.”
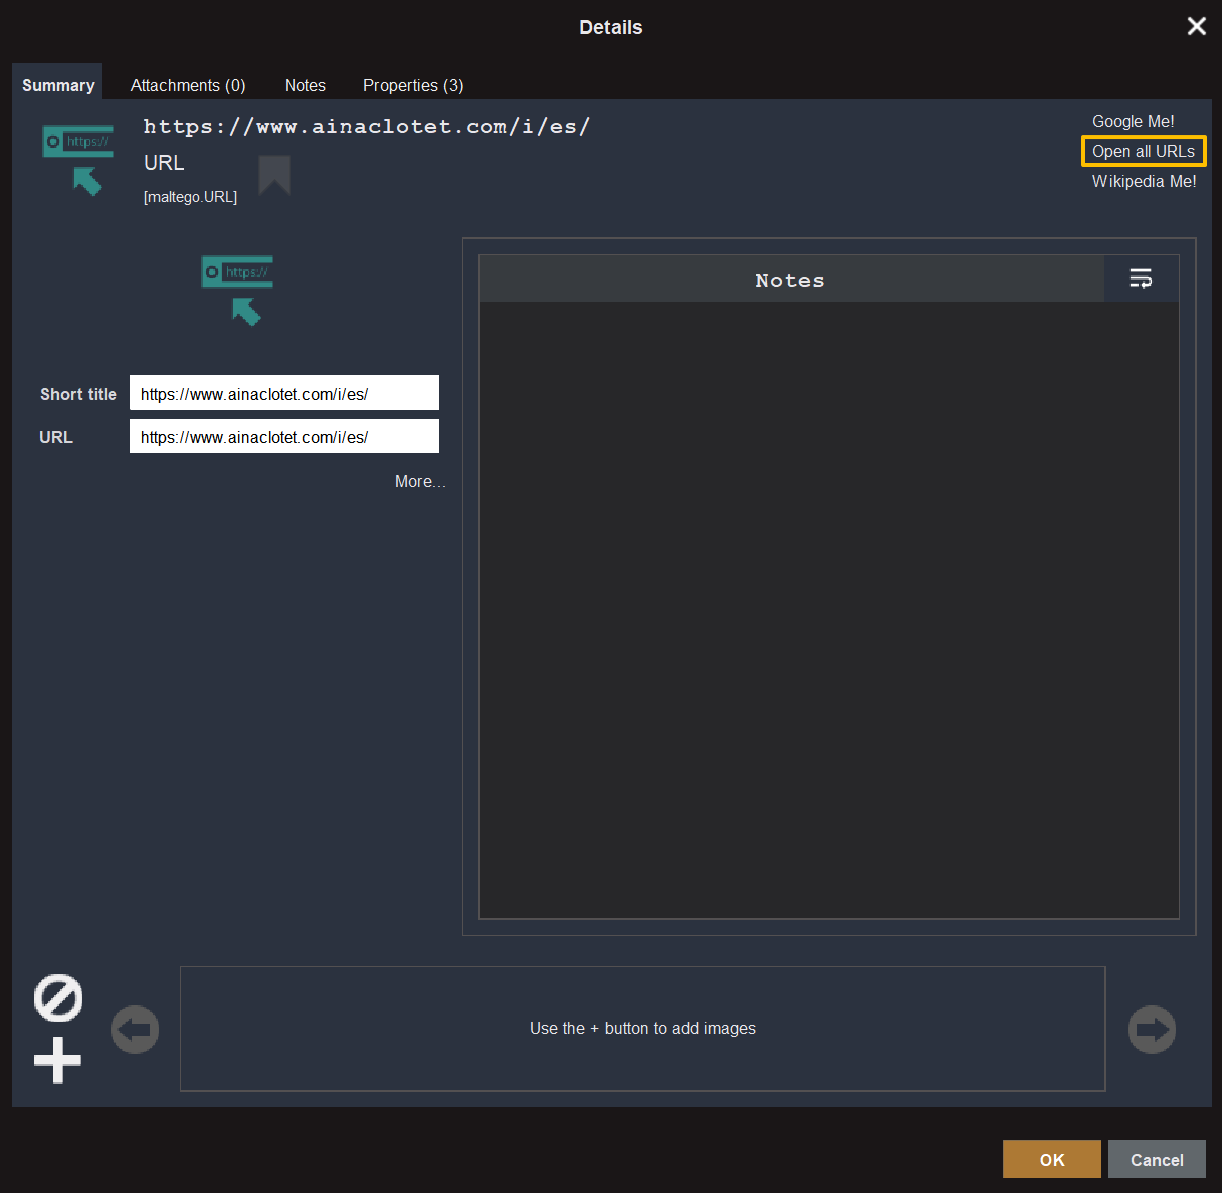
As we open the website and scroll down to the bottom of the page, we can observe the contact details of Aina’s representatives, thereby confirming the results obtained through Maltego.
Retrieved phone numbers and email addresses may also prove important in later stages of the research, so keep that in mind when you launch your own investigations.
Step 3: Social Media Footprint 🔗︎
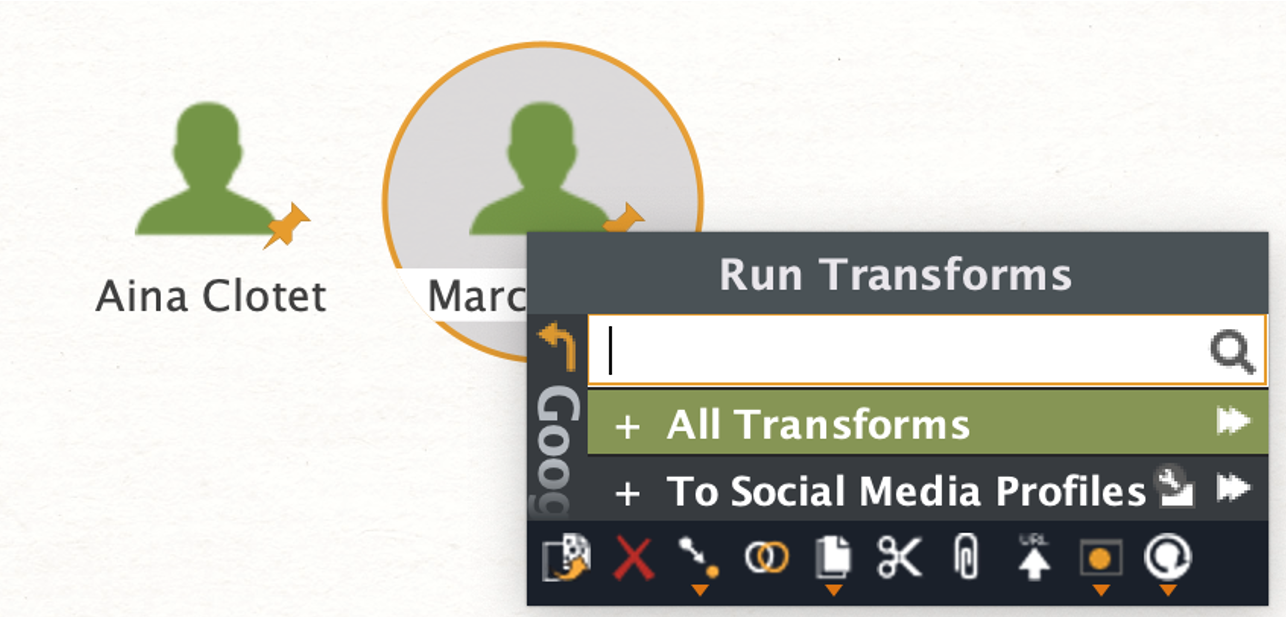
Now, we will try to map the social media profiles of our targets. Let us open a new graph and start with two Person Entities.
This time, instead of applying dorking techniques, we will use a variety of Maltego Transforms tapping into social media intelligence (SOCMINT).
We will begin with the To Social Media Profiles Transform from the Google Social Network Transforms.
After refining the graph to display only relevant Entities, we can see a couple of accounts registered on popular social media platforms with photos of our targets.
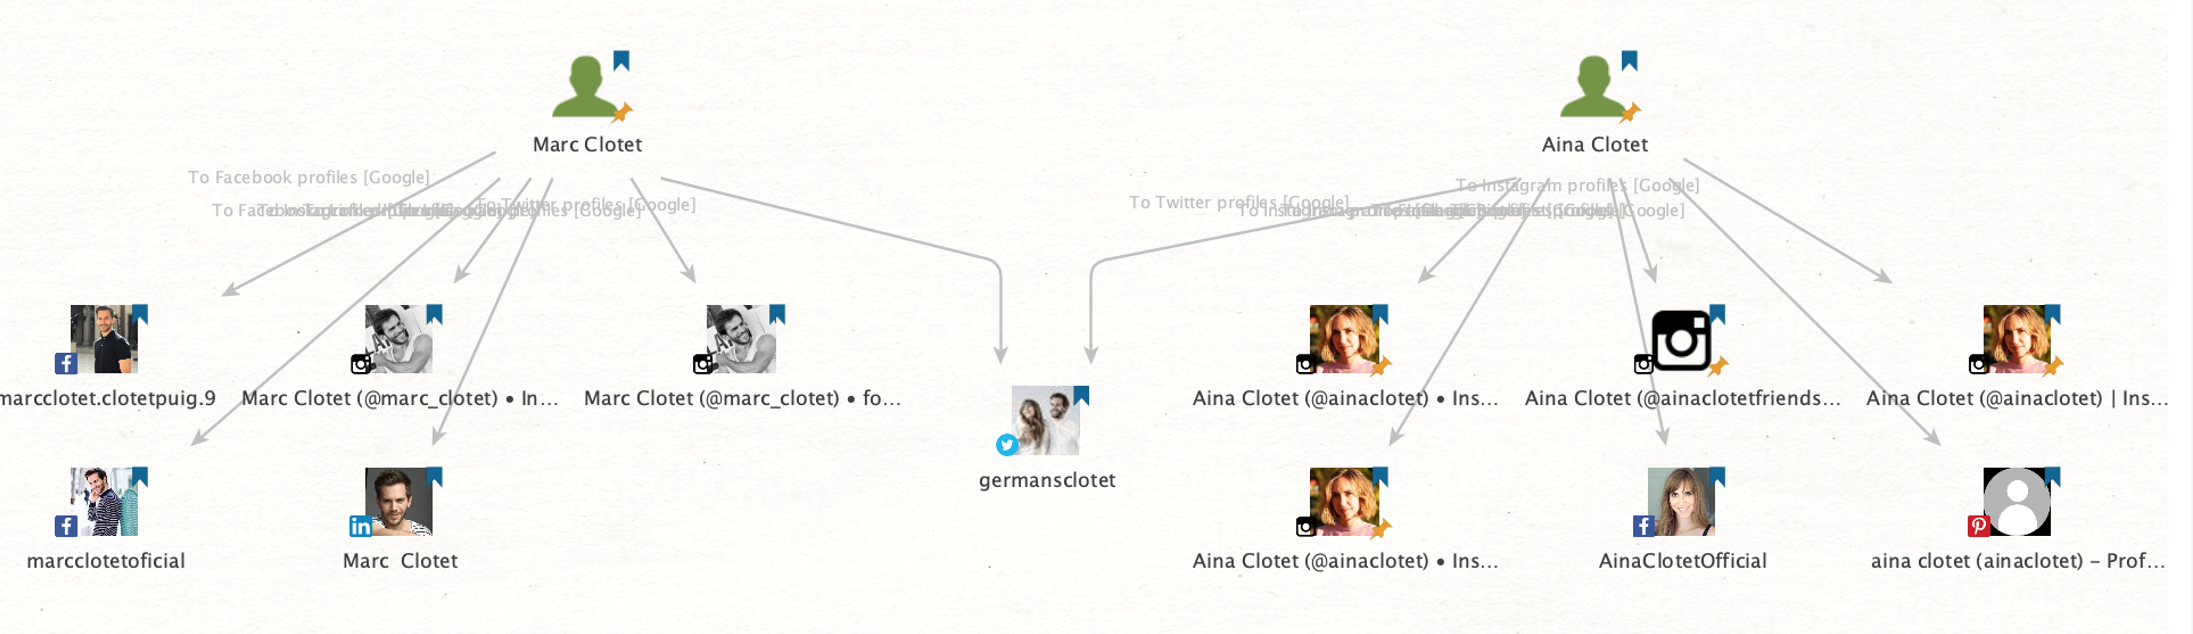
If you take a closer look at the profiles, you will discover that these accounts are usually public and have thousands of followers. We can also easily list some of the aliases used across the platforms, such as “marc_clotet,” “marcclotetoficial,” “ainaclotet,” or “AinaClotetOfficial.”
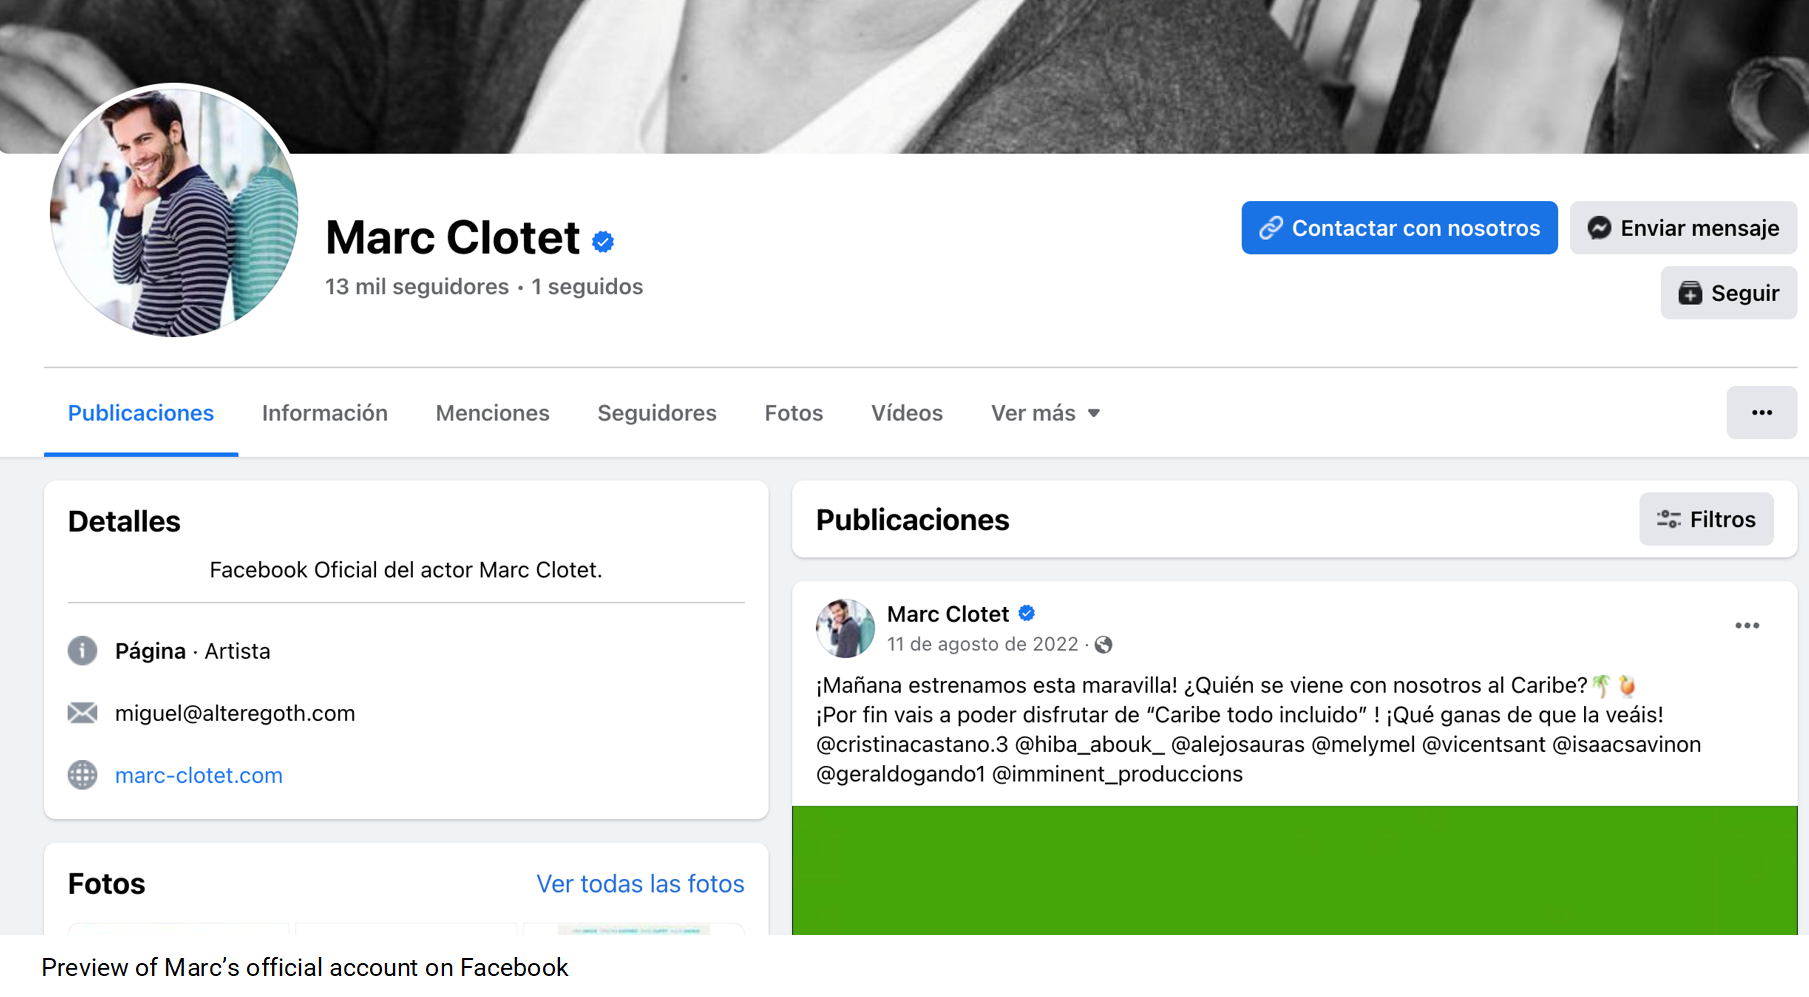
The official accounts are often marked by checkmarks to show that they are verified and recognized by the public person.
We do, however, seem to have identified a personal Instagram account named “ainaclotetfriends” with the accompanying biography, “Page just for friends;) official page @ainaclotet."

Since it has become quite common these days for public figures to use Instagram for both private activities and public promotion, we will now focus on mapping their Instagram activities and mutual connections.
We will first use the previously discovered usernames “ainaclotet” and “marc_clotet” to extract the Instagram Entities on a new graph using the Get Instagram User [Vetric] Transform. Then, we will map out the profiles they follow and those that follow them back by running the Find Mutual Following [Vetric] Transform.
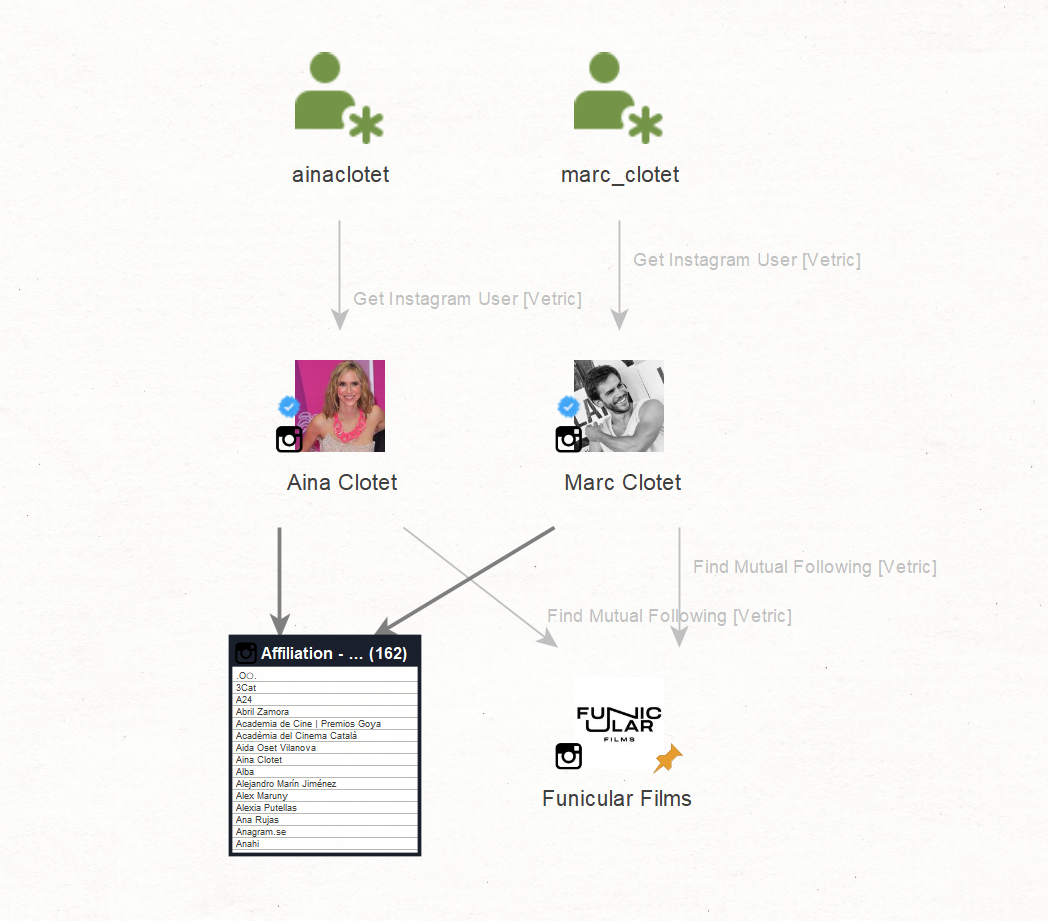
The Transform returned a large number of relevant profiles, such as the Instagram account of what appears to be a company named “Funicular Films.”
We also stumbled upon following relationships to private accounts, indicating a potentially close relationship between the owners of those accounts and our targets, especially since these accounts also follow the targets back. This discovery could serve as a valid starting point for further investigations of a similar nature.
Step 4: Company Investigation 🔗︎
In a person of interest investigation, it is also important to consider the professional relationships and affiliations of our targets.
In the previous step, we found a link to the entity “Funicular Films,” which appears to be the name of a company. Let’s follow this lead and examine how it connects to our targets.
We will open a new graph and run the To Website [using Search Engine] Transform on the “Funicular Films” Phrase to find the official website of this Entity and the To URLs [show Search Engine results] Transform to find relevant pages.
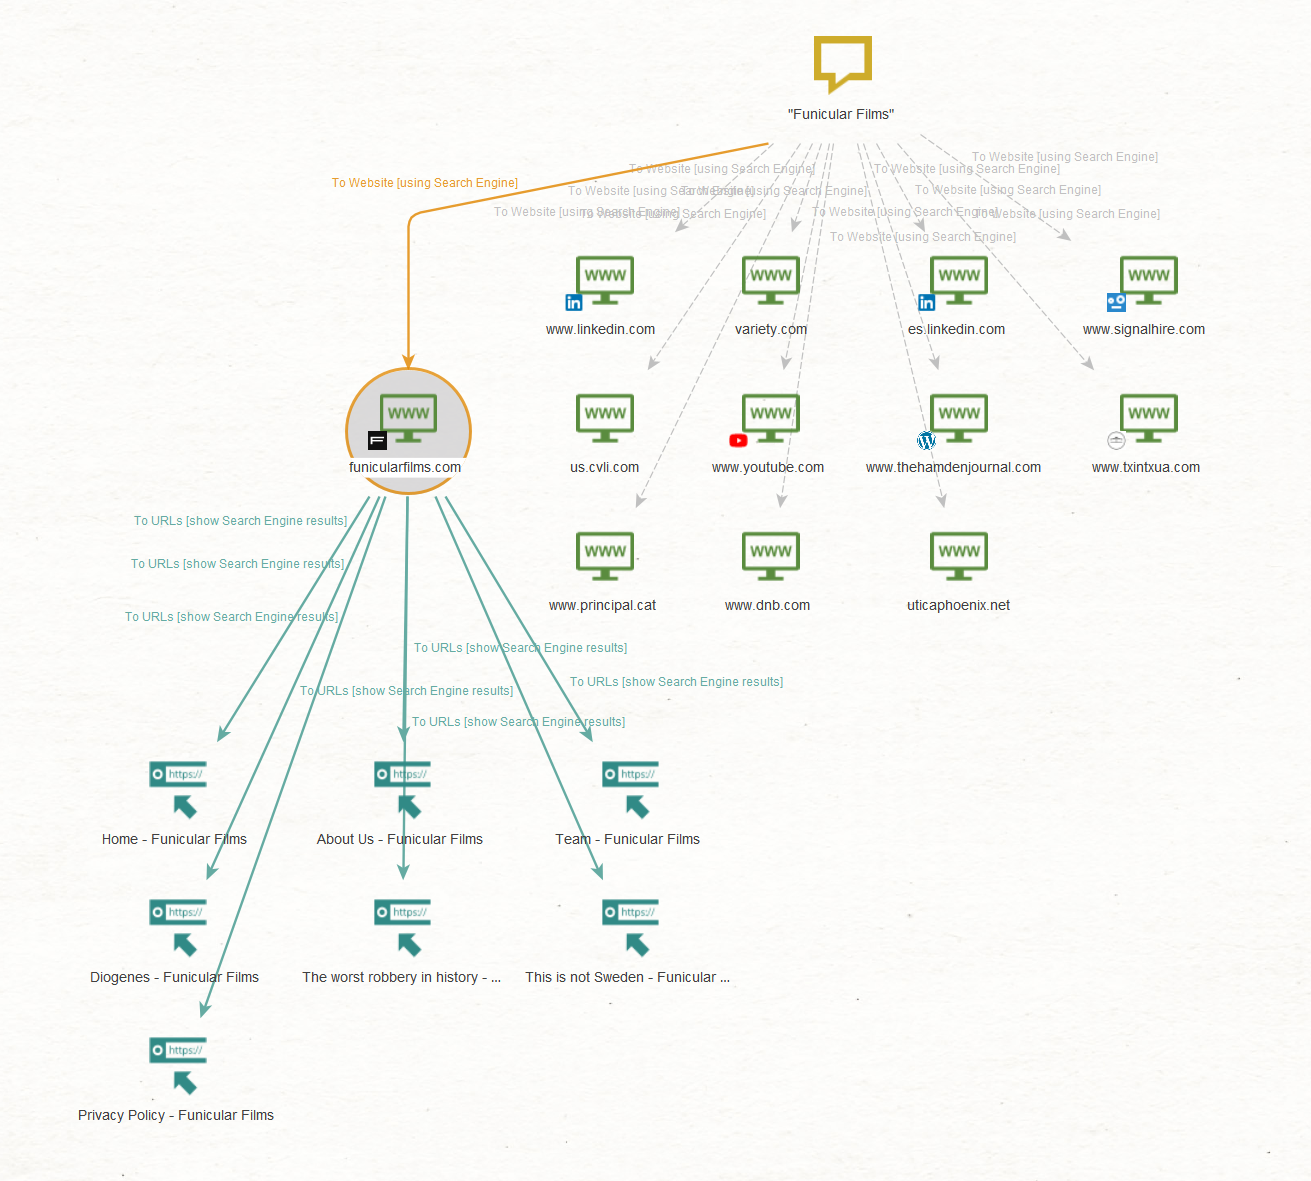
There are two pages under the “funicularfilms[.]com” website that caught our attention: “Team – Funicular Films” and “Privacy Policy – Funicular Films.”
We want to explore the first one to find information on the company’s officers and the latter to obtain information about the company’s legal name. To do that, select both Entities and run the To Entities [IBM Watson] Transform.
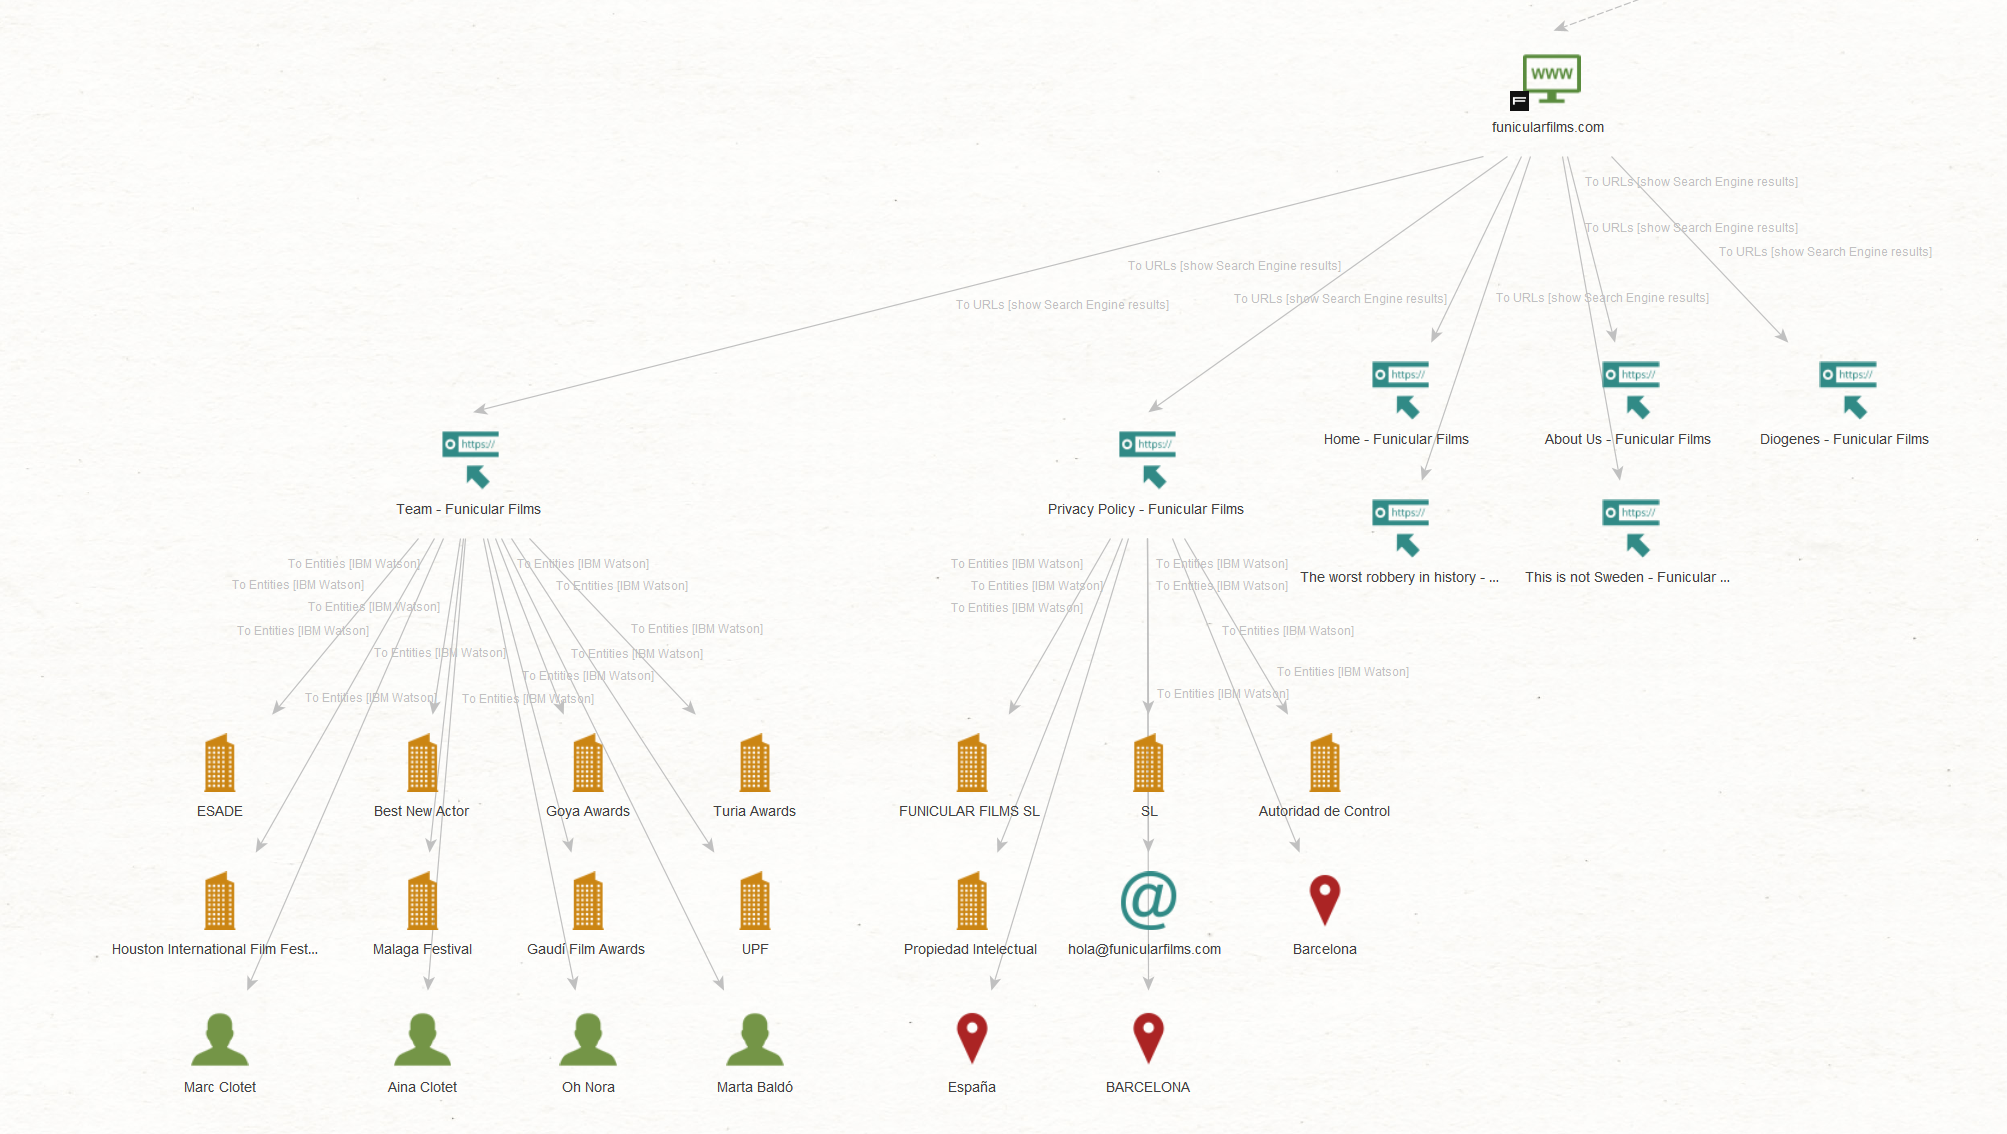
We see that our targets are affiliated with the company they follow on social media, thereby confirming the accuracy of our investigation results.
Additionally, we have identified other officers linked to this company as well as its legal name – “FUNICULAR FILMS SL,” which seems to be based in Barcelona, Spain. This aligns with the location of the actors we discovered in Step 1.
Step 5: Infrastructure Investigation 🔗︎
This part of our investigation will focus on a couple of domains discovered in Step 3. Our goal is to find associated email addresses and other domains that link to those email addresses.
In a new graph, we will paste the following website domains as Domain Entities onto the graph:
- ainaclotet[.]com
- marcclotet[.]com
- marc-clotet[.]com
- funicularfilms[.]com
We will now use the DomainTools data source, which contains domain registration records known as Whois information, to search for email addresses associated with those domains by running the dtDomain2HistoricEmail [DomainTools] Transform.
Next, we find other domains registered with the same email addresses with the dtEmail2HistoricDomains [DomainTools] Transform.
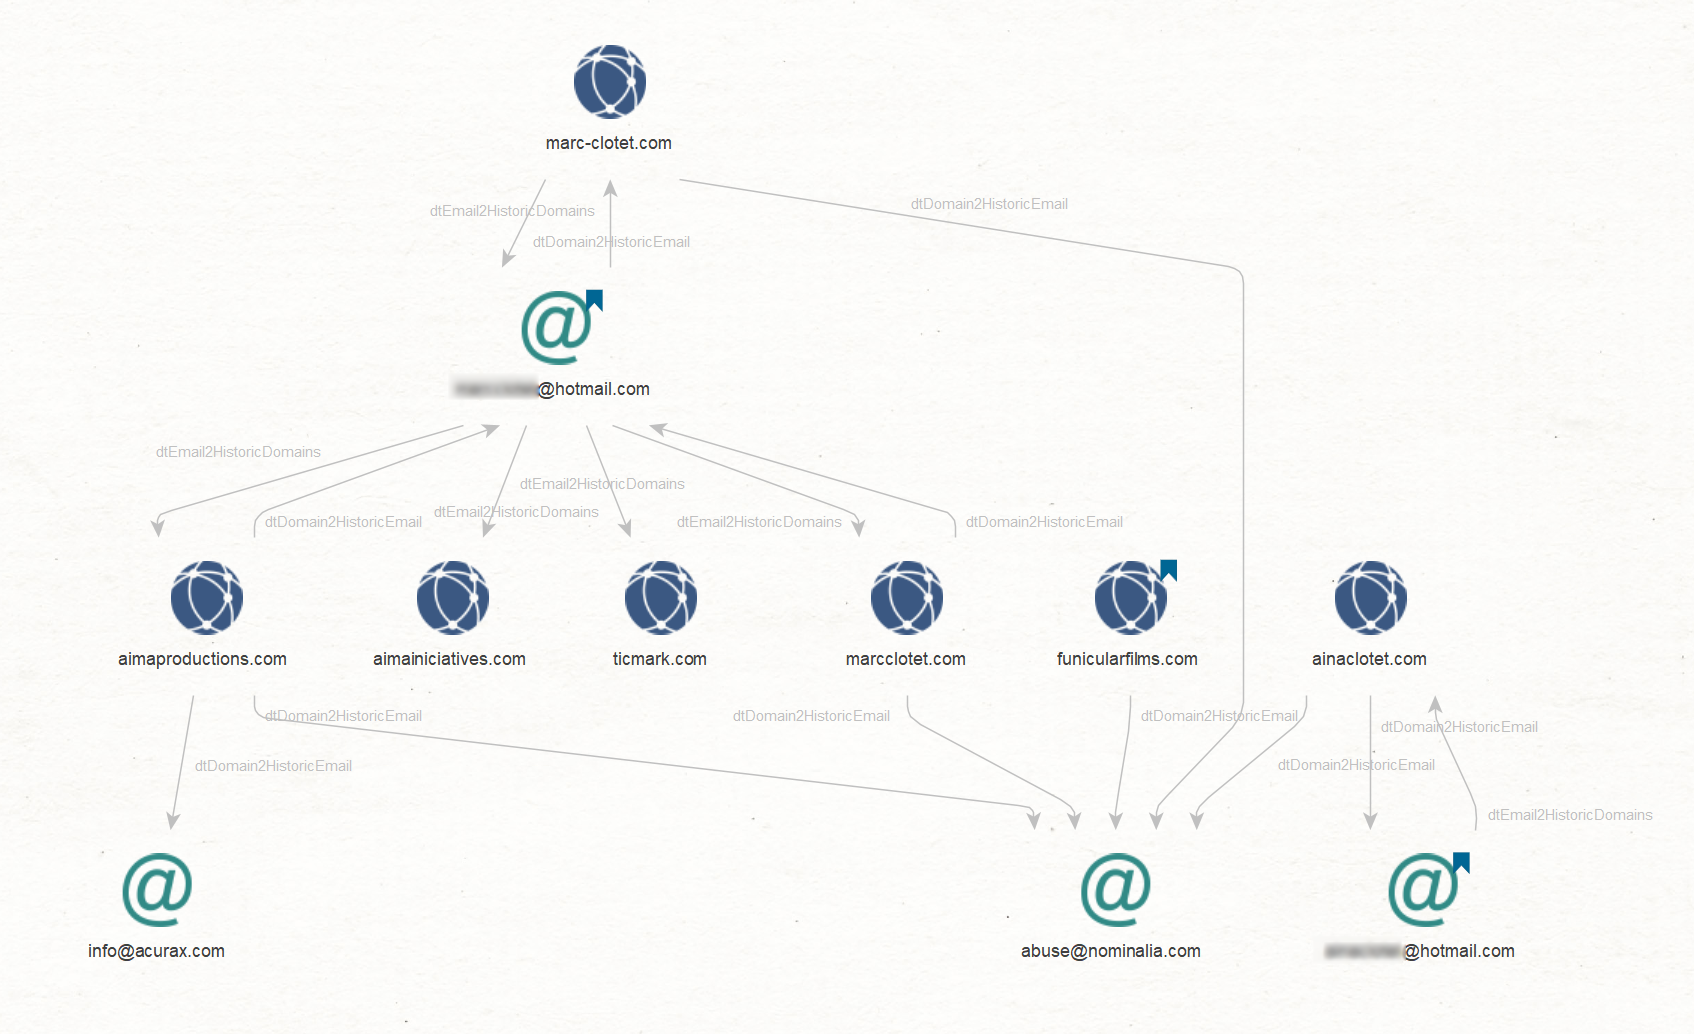
Among the email addresses we find, two of them seem to be their personal Hotmail email addresses.
This information holds great value in person of interest investigations as it enables us to find out more about a person’s online footprint and uncover more specific identity intelligence.
Step 6: Personal Sphere 🔗︎
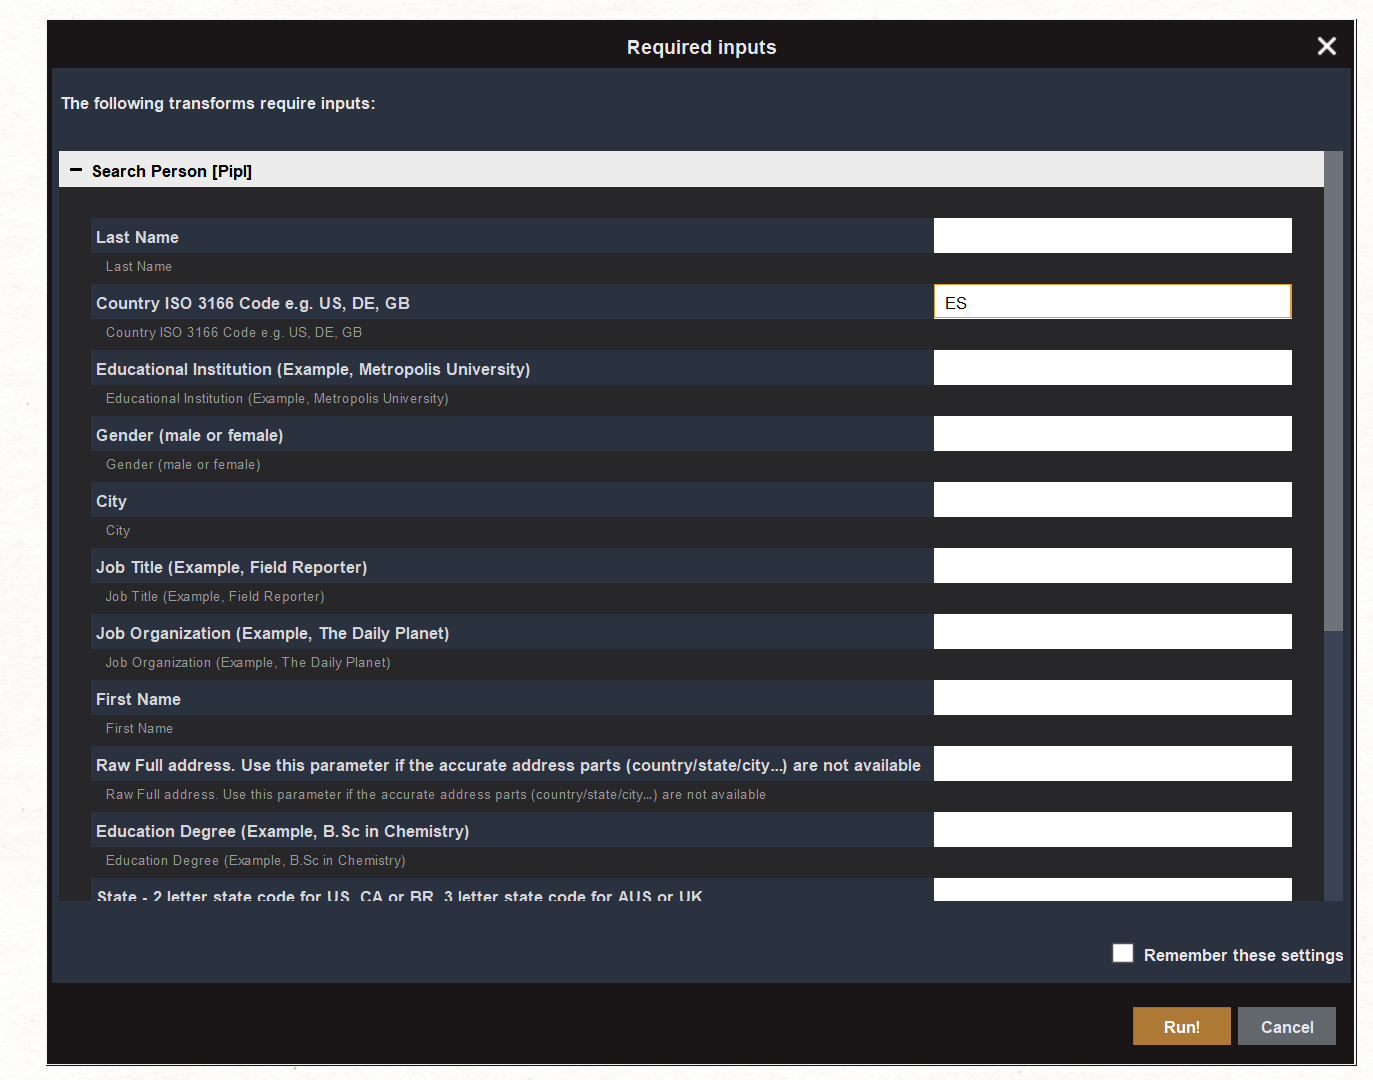
In the final step, we will take our recent finding, namely, the targets’ private email addresses, and pivot from them using the To Search Person [Pipl] Transform to find matching person profiles.
To narrow down our search and find an exact match, we can provide additional information in the wizard, such as the country code “ES” for Spain. Since we have already established a connection between the actors and Barcelona, Spain, including this data will help us refine our search.
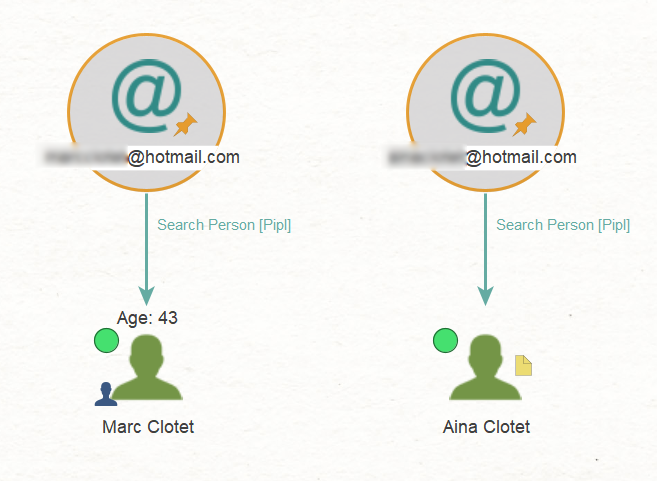
Maltego retrieved the names of Marc and Aina, indicating that the email addresses likely belong to them. Interestingly, the search also yielded the most probable age for Marc, which is 43.
Let’s delve deeper into their profiles and discover more information by running the To Expand in Full [Pipl] Transform.
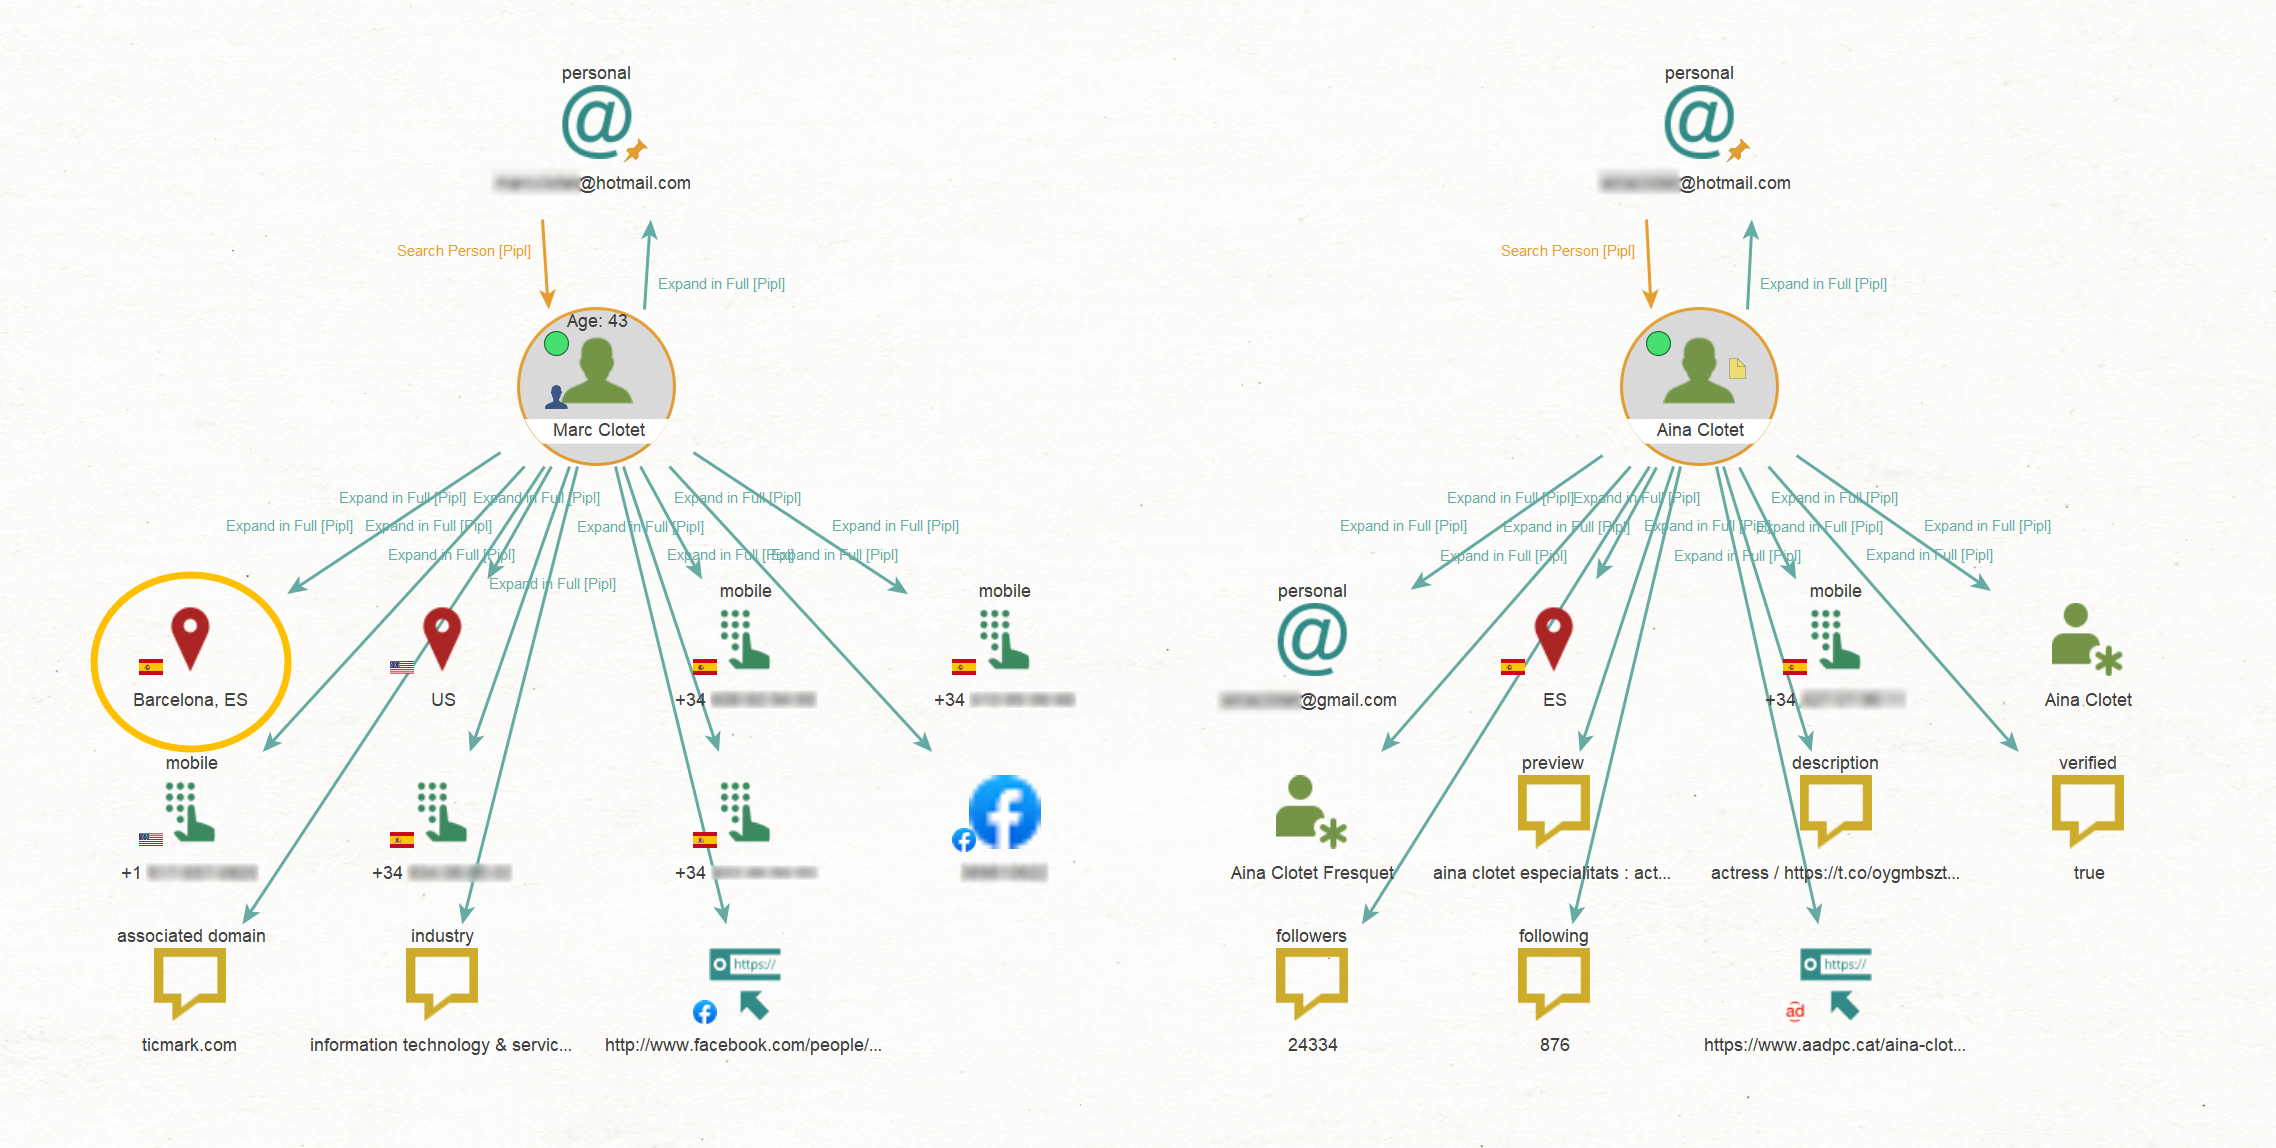
Our findings include Aina’s personal Gmail address, a collection of phone numbers, and locations associated with our targets.
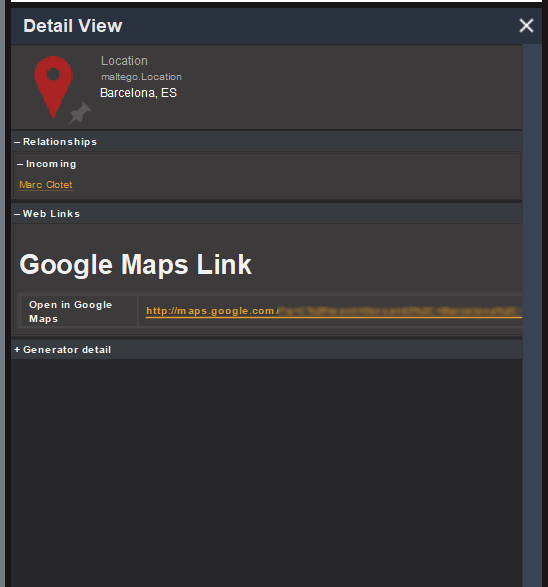
In fact, we can also see the precise address of the location connected to Marc in the Detail View, which appears to be a private house when viewed on Google Maps.
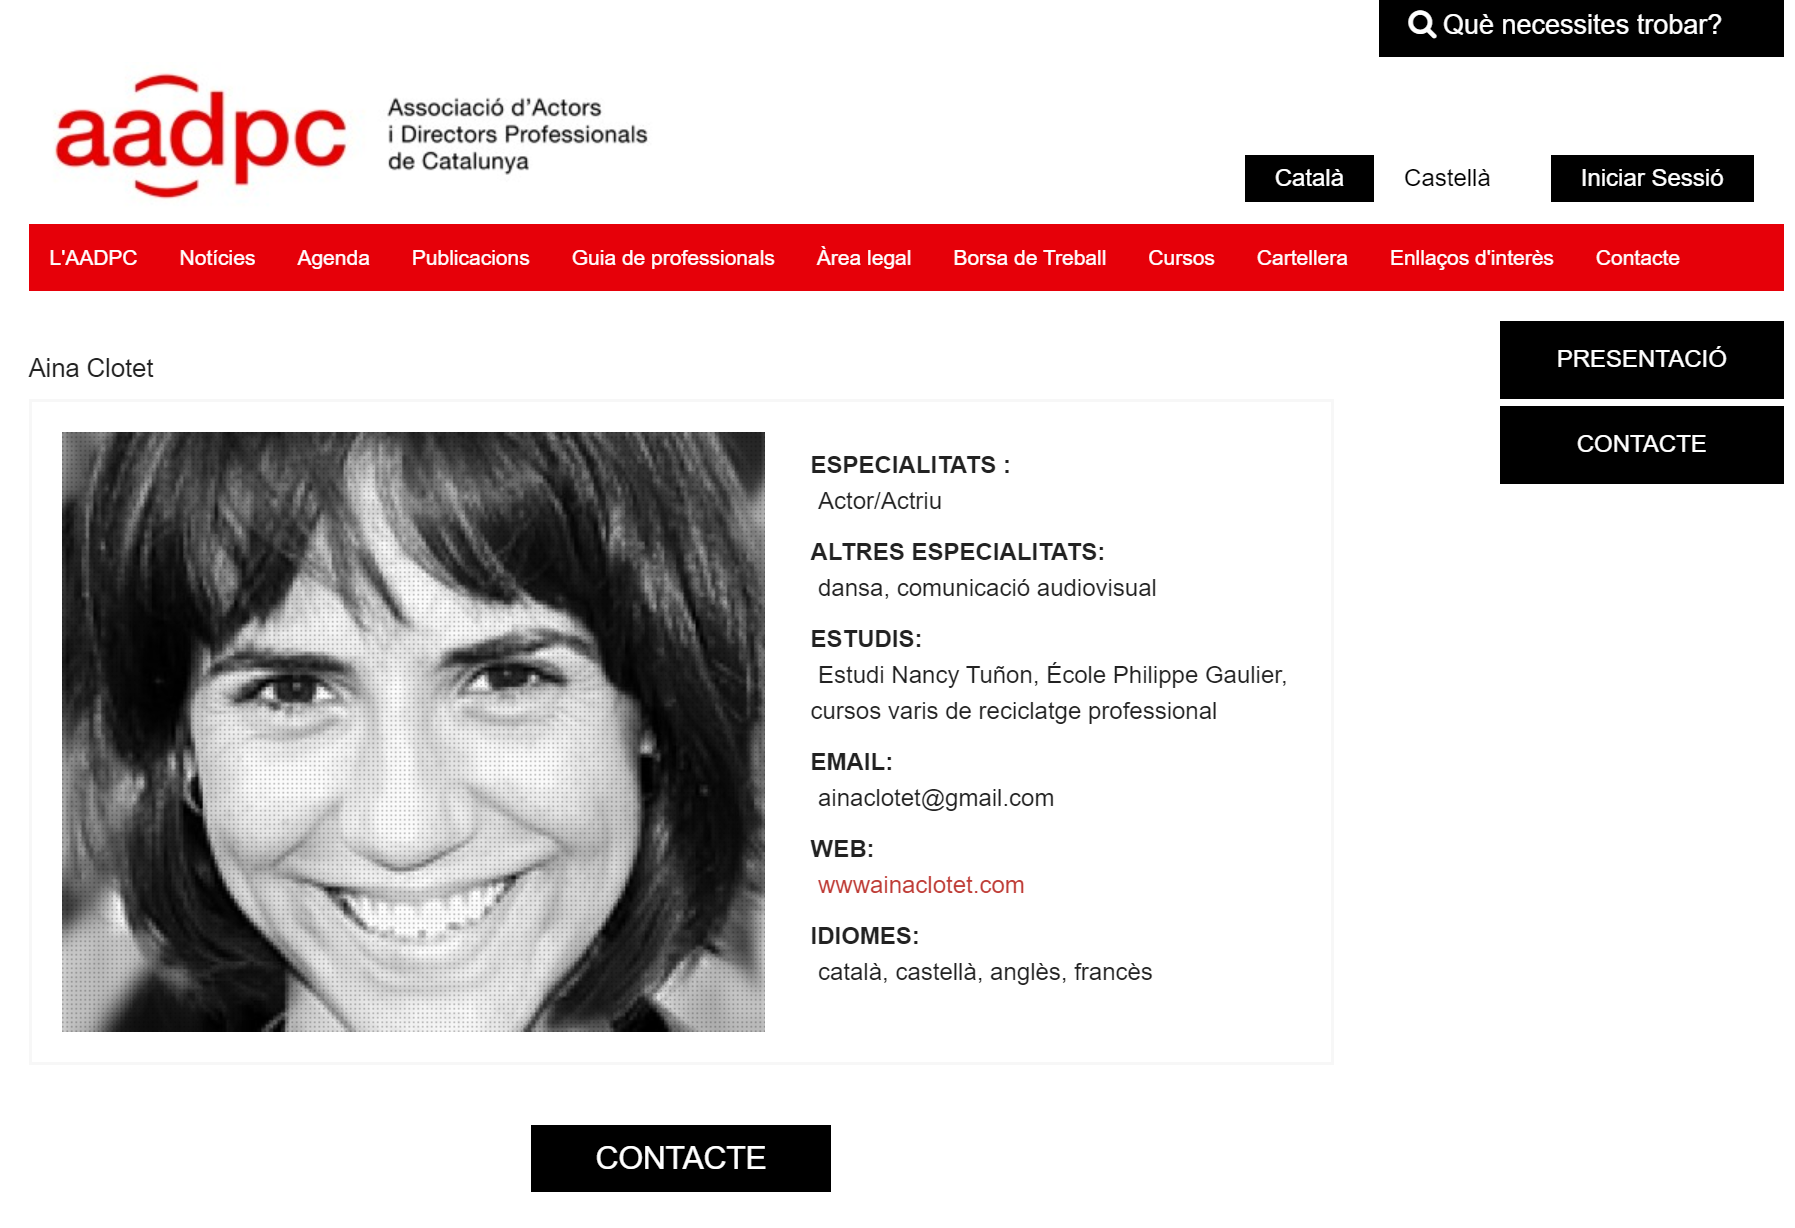
We also managed to obtain a URL leading to a website that contains Aina’s profile, featuring additional personal information such as her photo, educational background, and the languages she speaks.
As the next step, we wanted to verify the retrieved phone numbers employing the To Look up phone number [OpenCNAM] Transform.
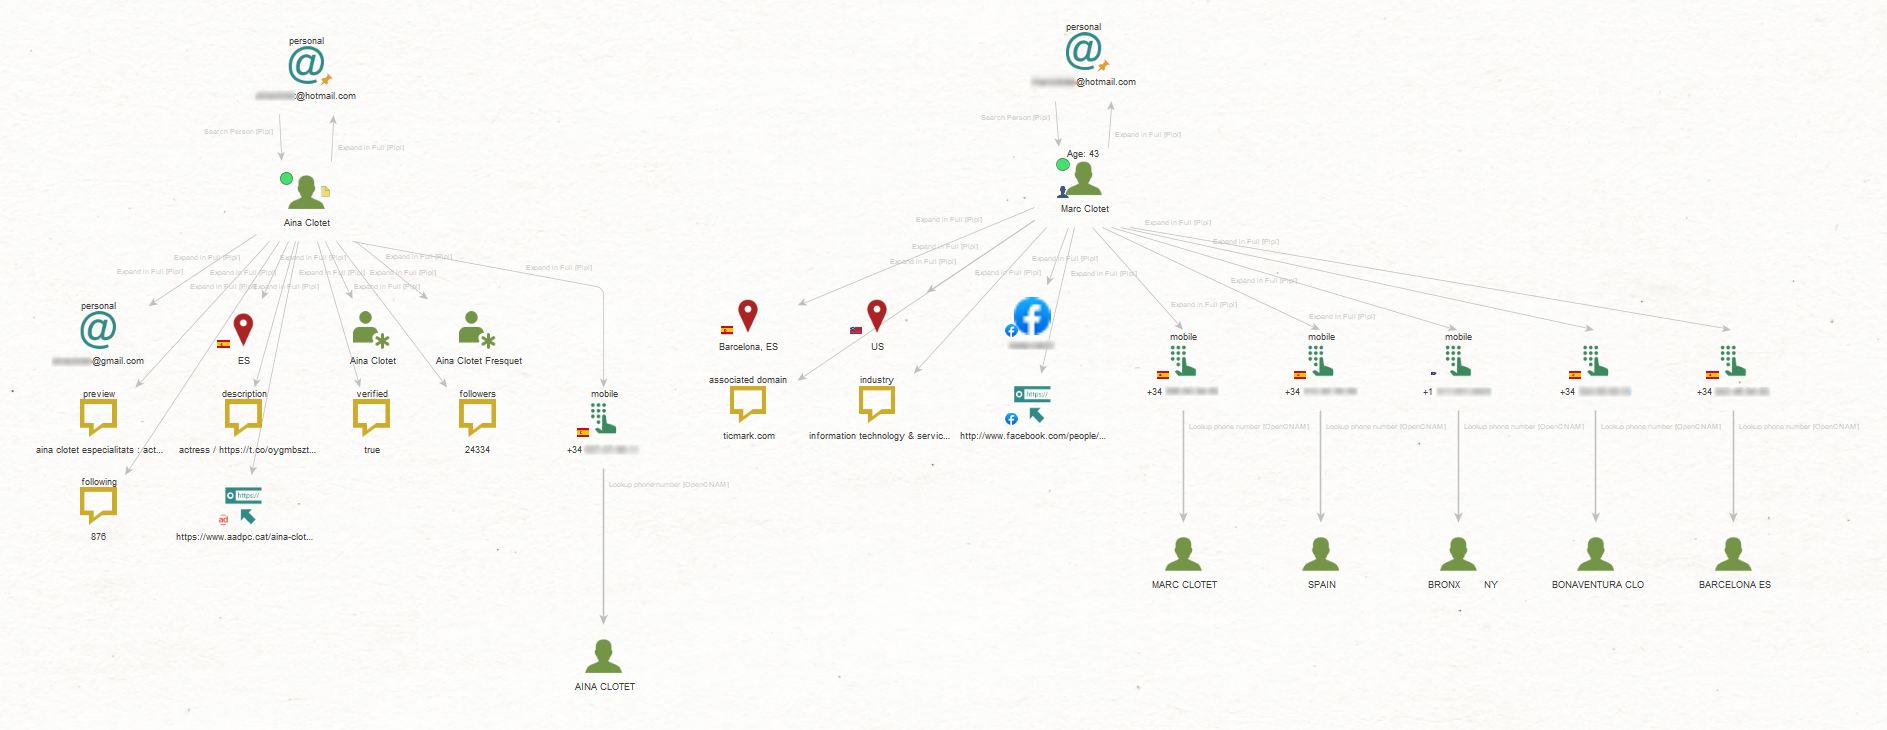
This led to discovering Entities associated with the numbers, revealing details such as the names of our targets, location indicators, and the name of their father.
What could also prove interesting are the Pipl Tag Entities (To Tags [Pipl] Transform). These Entities represent the hobbies, interests, and other notable information about the targets.
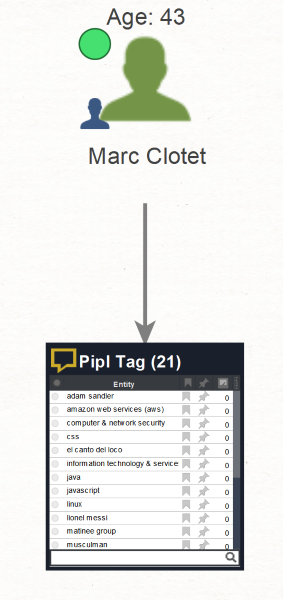
While these particular interests are harmless, little nuggets of information like these from a person’s past (or present) can help us to glean a complete picture of, and get closer to a person and his or her interests.
Enrich Your Person of Interest Investigations with More OSINT Data 🔗︎
You have reached the end of the example of a personal recon process that investigators can perform using Maltego.
To quickly recap, we started with two names to discover their personal websites, location, and family member names.
We further explored their online presence, uncovering associated websites and domains. Then, we identified their official and private social media accounts with profile pictures and delved into their network of social contacts.
Moving forward, we investigated a company affiliated with both targets and traced domains connected to our targets back to their personal email addresses. Finally, we used those email addresses to find more detailed personal information, including private phone numbers and a home address, which added another layer of understanding to our investigation.
Pivoting to Other OSINT Data 🔗︎
From the different Entities returned to our graph, we could of course investigate deeper and wider, such as pivoting into a reverse image search or conducting a network footprint using the targets’ email addresses. This would help us to map an even more extensive online and infrastructure network of the person of interest.
If we are conducting the person of interest investigation for fraud, we could also look at the target’s business relationships using the OpenCorporates and WhoisXML data integrations. We showed such a use case in our joint webinar with Pipl.
Download Your Cheat Sheet 🔗︎
If you would like to reproduce the steps in your Maltego or delve even further into your investigation, do not forget to download the workflow cheat sheet enriched with additional investigative points!
Download the resource
We hope you enjoyed this demonstration of a person of interest investigation. Don’t forget to follow us on Twitter and LinkedIn and sign up to our email newsletter to stay updated on the latest tutorials, use cases, and webinars!
Happy investigating!
About the Author 🔗︎

Carlos Fragoso
Carlos is the Principal Subject Matter Expert and Lead Instructor at Maltego with over 20 years of professional experience in information security: Incident response, digital forensics, threat intelligence, and threat hunting. A curious and passionate investigator working with big companies and LEAs to tackle cybercrime around the world (Europe, Middle East, LATAM) SANS Institute Instructor.