Our previous article in this series explored the process of using Maltego to perform attack surface assessments while using only free sources. In this one, we will look at technical reconnaissance to identify security risks associated with vulnerabilities, insecure open ports, outdated software, juicy instances, and more.
This edition will turn our focus into supercharging these assessments by automating our workflows using Maltego Machines.
Exploring Your Attack Surface with Maltego How to Automate Your Attack Surface Assessment with Maltego (Reading Now)Maltego for Attack Surface Assessments: A Blog Series 🔗︎
The Starting Point: Footprint L1 Machine 🔗︎
You may remember that last time we started our assessment by running the Footprint L1 (FP-L1, for short) Machine. Then we used different Transforms to search for additional information that could lead us to find security risks like the ones we just discussed. So we should use the Footprint L1 Machine as a template and add those additional Transforms and checks into the workflow.
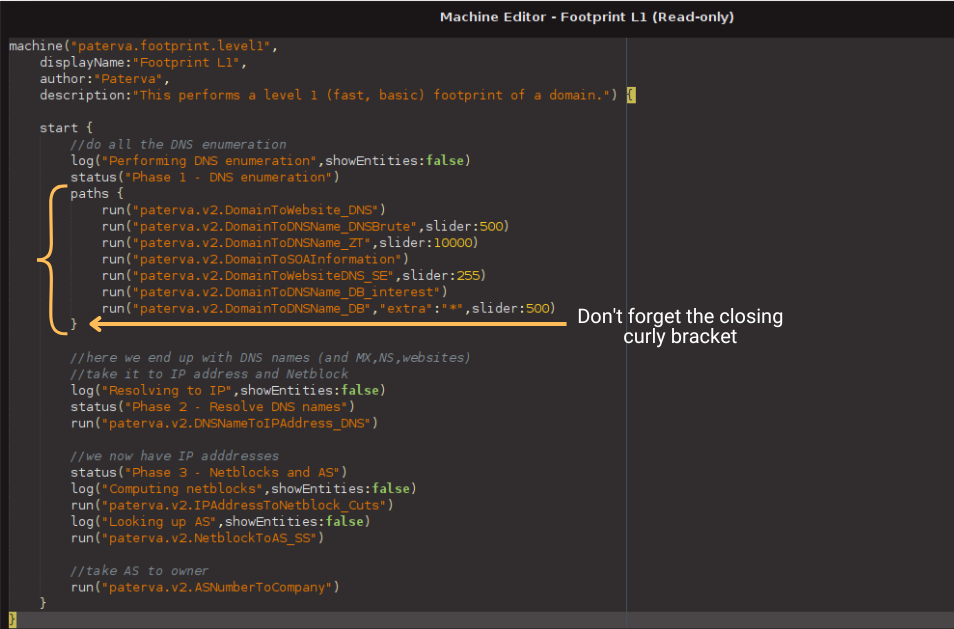
Before we dive into that, let’s first review the different phases or stages of the Footprint L1 Machine.
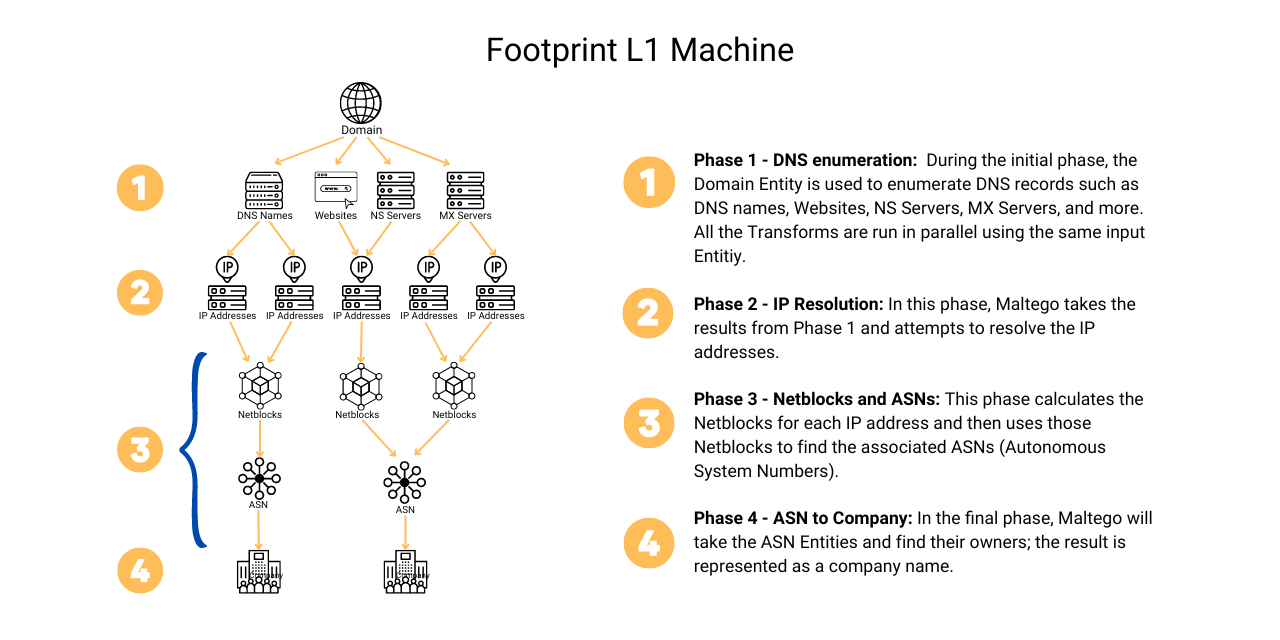
Now that we have a clear idea of how it works, we can draw up the blueprint for building our Custom Machine.
Creating the Blueprint for a Custom Machine 🔗︎
Let’s make a list of the additional steps we took after running the FP-L1 Machine.
What we did was:
- Identify the Entities in scope for the assessment — in our case, it was a company Entity named after our target, whose associated infrastructure we moved to a new Graph.
- Search for Juicy Instances with the To DNS Name (interesting) [SecurityTrails] Transform.
- Confirm Live Instances by running the To IP Address [DNS] Transform.
- Use Shodan to identify vulnerabilities in IP Addresses and Netblocks with the To Vulnerable IP Addresses [Shodan] and To Vulnerabilities [Shodan] Transforms.
- Find open ports by running the To Ports [Shodan Internet DB] and To Ports [OTX] Transforms.
- Use IP Addresses to search for running services with the help of the To Services [Censys] and To Services [Shodan] Transforms.
Having the blueprint in place, let’s now jump into Maltego to start building our Machine.
Creating our Machine in Maltego 🔗︎
The best way to get started is by cloning the Footprint L1 Machine and adding additional steps to the workflow.
Before anything else, please make sure you have installed all the required data sources:
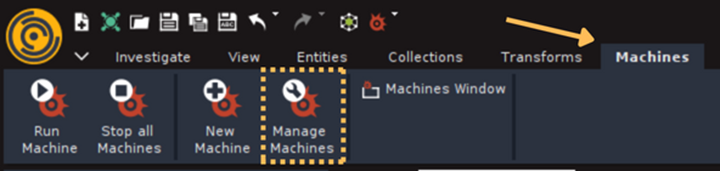
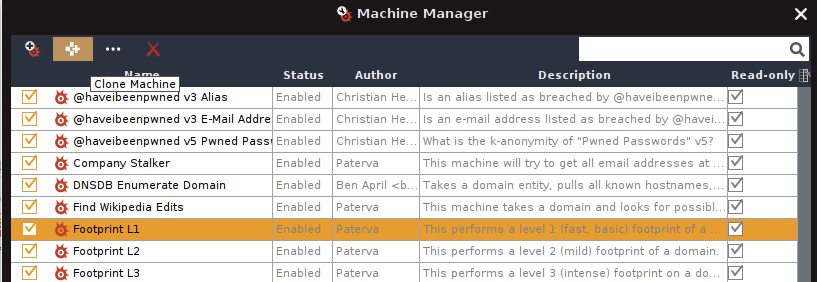
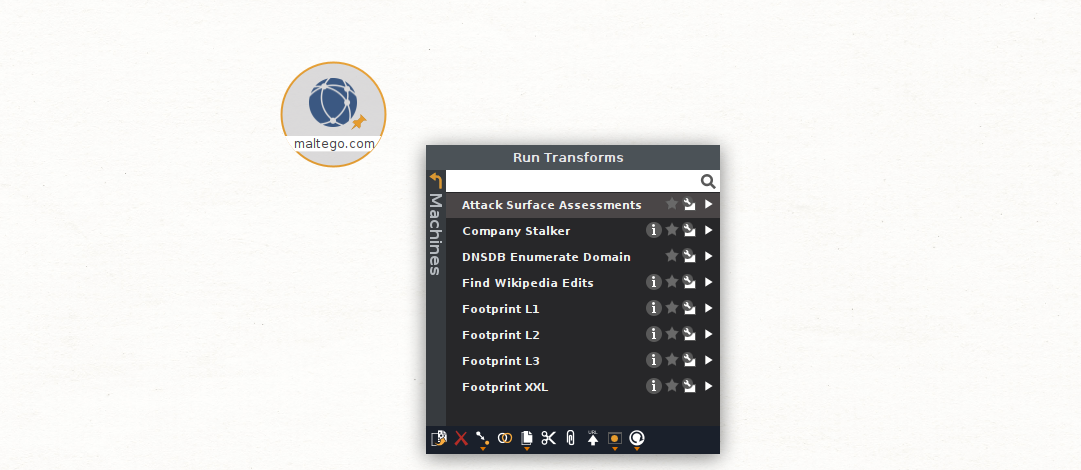
To clone the Machine, select “Manage Machines” under the Machines tab in Maltego. This will open the Machine Manager Window.
The list of Machines depends on which Hub items you have installed, so it might look slightly different on your side, but the Footprint L1 Machine is a standard one so you should have it as well.
Select the Machine and click “Clone Machine” (the second button from the left).
A new Machine will automatically be created below the original one. Select the newly created Machine and click on “Edit Machine” (third button from the left).

The Machine Editor should be open now. I know it may look complicated at first glance but there is no need to worry. We will guide you through the next steps.
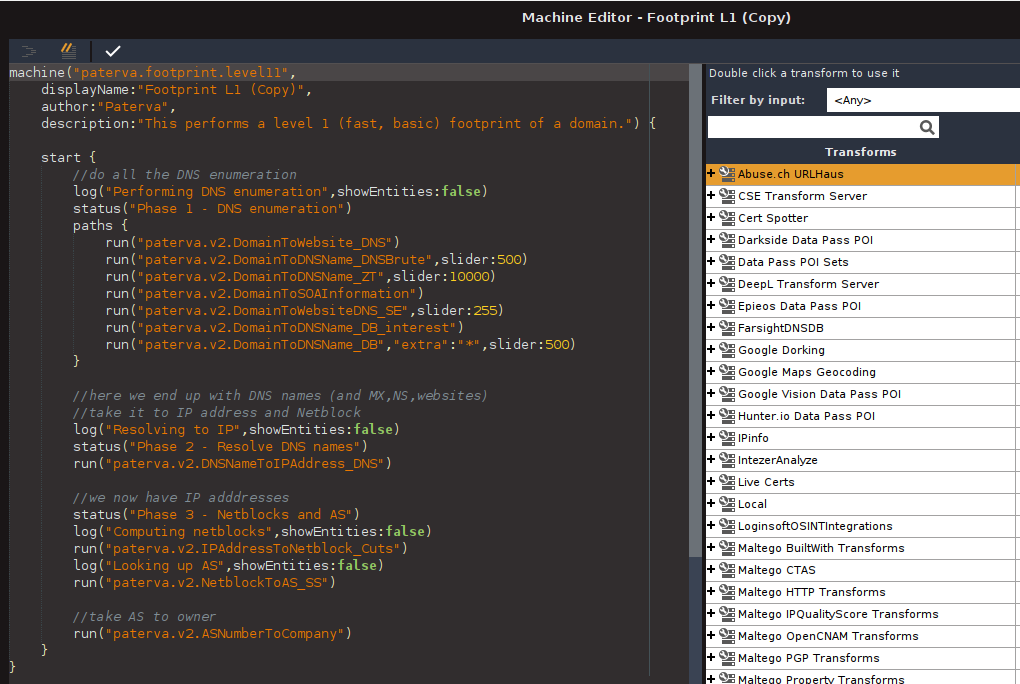
Let’s break this window into two parts and look at the code first. I have identified the phases of the Footprint L1 Machine in case you are curious about the code.
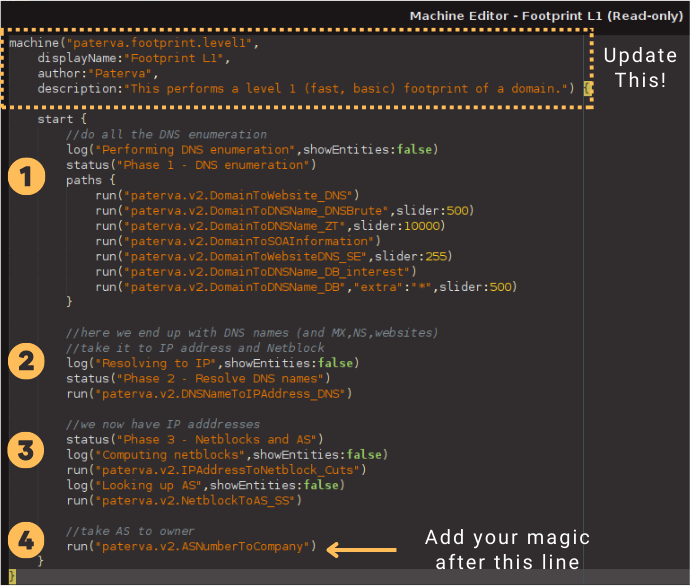
Let’s start by updating the information at the top first, using the following examples as a guide.
- displayName:“Attack Surface Assessment”,
- author:“Add Your Name”,
- description:“This performs a basic attack surface assessment.”
Once we are done, we can add the additional steps to the code. Let’s follow the blueprint we created a few moments ago.
Identify Entities in Scope and Delete the Rest 🔗︎
As mentioned earlier, last time, we started our exploration by running the Footprint L1 Machine. After the Machine had run, we narrowed down the scope for our assessment using the Company Entities, and then we moved all the relevant Entities into a new graph. That’s something we cannot do with a Machine at the moment, since Maltego doesn’t have that feature yet. However, we can pull off some tricks to achieve a similar result. Here’s what you need to do now:
- Place your cursor next to the run(“paterva.v2.ASNumberToCompany”) line towards the end of the code and hit Enter a couple of times.
- Copy and paste the following code snippet into the Machine Editor. We will explain what each line does in a minute.
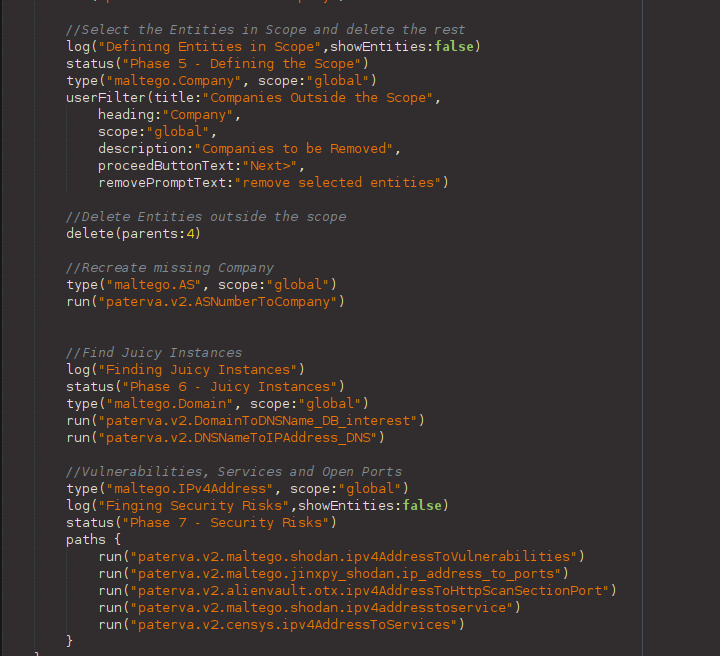
//Select the Entities in Scope and delete the rest
log("Defining Entities in Scope",showEntities:false)
status("Phase 5 - Defining the Scope")
type("maltego.Company", scope:"global")
userFilter(title:"Companies Outside the Scope",
        heading:"Company",
        scope:"global",
        description:"Companies to be Removed",
        proceedButtonText:"Next>",
        removePromptText:"remove selected entities")

//Delete Entities outside the scope
delete(parents:4)
degree(lessThan:1, scope:"global")
delete()

//Recreate missing Company
type("maltego.AS", scope:"global")
run("paterva.v2.ASNumberToCompany")

degree(equalTo:0, scope:"global")
delete()
- Select the code snippet in the Machine Editor window and click the “Format” button (upper left corner). That should automatically rearrange the code in the correct format.

That was easy, right? Now, let’s take a moment to review the code we just added. Note that it is written using the Maltego Scripting Language (MSL).
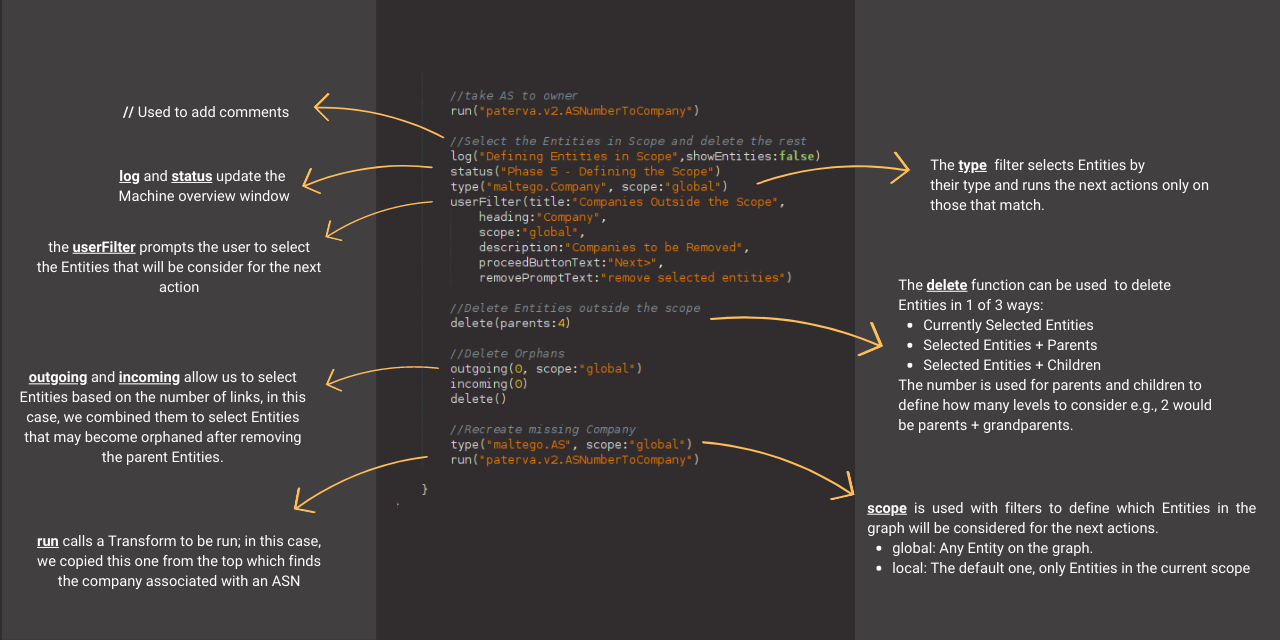
We will use some of those filters, options, and functions throughout the rest of the Machine. If you need a quick refresher on what each of these is used for, you can refer back to the image above.
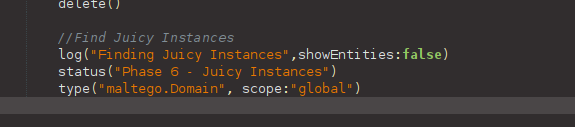
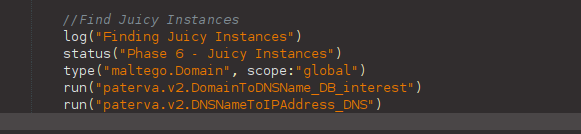
Search for Juicy Instances 🔗︎
The next step in our workflow is searching for additional “Juicy Instances” and then confirming the live ones by resolving their IP addresses. We need to add the To DNS Name (interesting) [SecurityTrails] Transform and then the To IP Address [DNS] Transform to confirm the new servers are live.
However, the To DNS Name (interesting) [SecurityTrails] Transform works only on Domain Entities, and the last output was a Company Entity. Fortunately, we just learned that we can use filters to select Entities anywhere on the graph, so let’s enter the following code after the snippet we added a few moments ago.
Here, we must use the other section of the Machine Editor to add new Transforms to our Machine. The easiest way to find the Transforms you seek is using the “Filter by input” menu.
Let’s search for Domain [maltego.Domain] and click on it. This will update the list of Transforms to show only those that accept a Domain Entity as the input.
Here, you need to click the plus sign associated with the data source containing your Transform and double-click the Transform you want to add to the Machine.
![Search for Domain [maltego.Domain] and click on it](/images/uploads/automating-attack-surface-assessments_10.png)
Let’s start with the To DNS Name (interesting) [SecurityTrails] Transform and then add the To IP Address [DNS] one.
You may have noticed that the Transform name looks different when added to the code. This is because the Machine requires the actual Transform Name, rather than the Interface Name displayed on the Menu. So, remember to use the “Format” button whenever your code looks out of place.

To be honest, I’m glad we don’t have to learn the actual names!
Ok, it’s time to learn about a different feature of the Machine Editor, the “Compile” button. This feature will test our code to ensure it works before we save the Machine, so you don’t have to save and run it each time you want to modify it. If everything goes right, you should receive a green “Success” note.
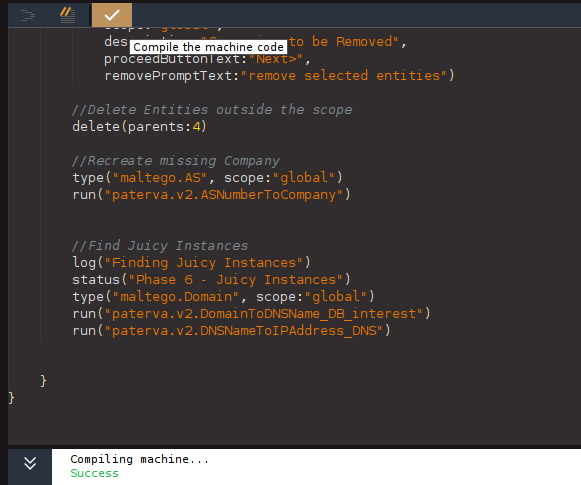
If something is wrong, Maltego will return an error with details to help you find the issue. The most common problems are associated with missing parenthesis, so keep an eye open for those!

Vulnerabilities, Services, and Open Ports 🔗︎
The last step required for the assessment is searching for vulnerabilities, services, and open ports. Since all the Transforms needed to fetch that information use the same type of input IP Address Entities, we can run the Transforms in parallel.
But what does that mean? Let’s take a step back to talk about how Maltego Machines decide the order in which Transforms run.
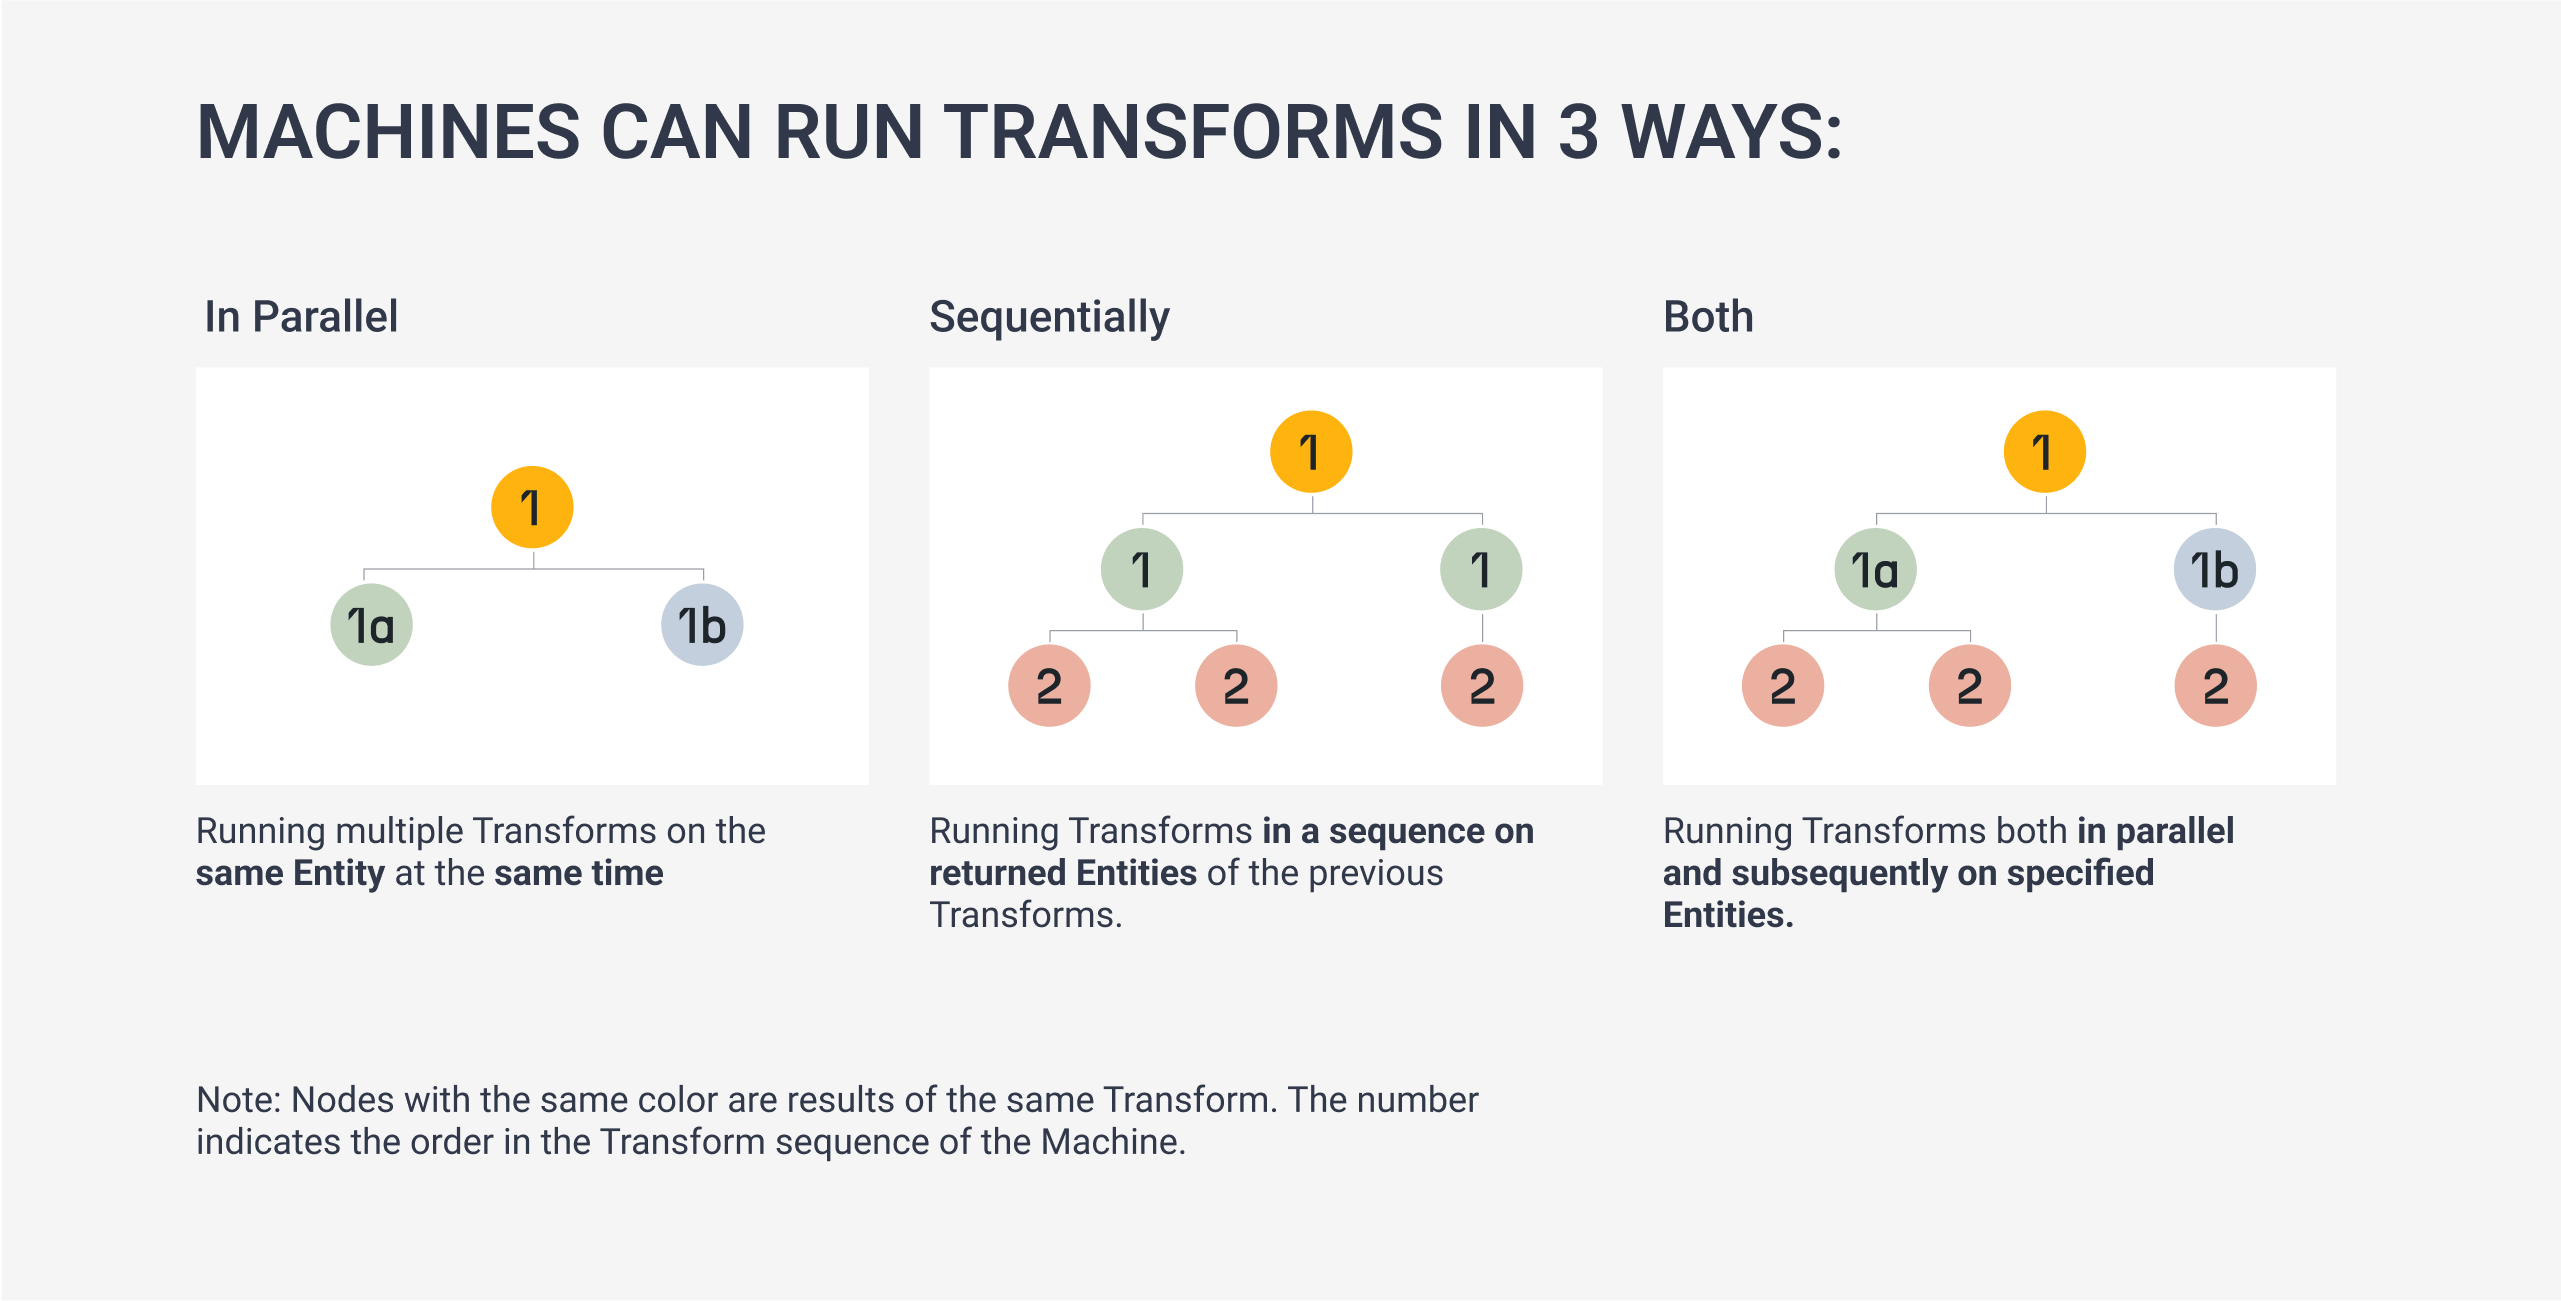
Machines can run Transforms both in parallel and sequentially. Users can run multiple Transforms on the same data Entity, run a series of Transforms from one data output to another, or do both simultaneously.
So far, we have been adding Transforms in sequential order (one after another). To run Transforms in parallel, we need to use Paths in Maltego. In fact, we can already see an example of this at the beginning of our Machine.
As you may have already guessed, all we need to do to run Transforms in parallel is to place the Transforms inside a paths{ < Our Transforms > } function.
As before, we will begin by adding a couple of new lines, using comments, log, and status to document what the Machine is doing, and using the type filter to select all the IP addresses on our graph.
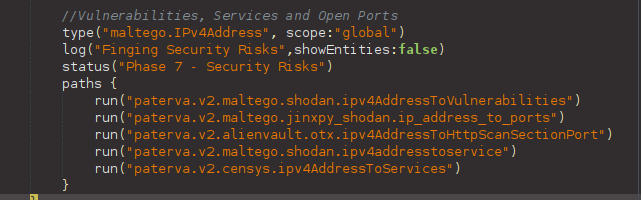
Below are the Transforms we will need to fetch the vulnerabilities, services, and open ports from the IP addresses (the italic string is the container’s name where you can find the Transform).
- To Ports [OTX] (AlienVault OTX)
- To Ports [Shodan Internet DB] (Shodan InternetDB Transforms)
- To Services [Shodan] (Shodan)
- To Services [Censys] (Censys)
- To Vulnerabilities [Shodan] (Shodan)
Let’s Format, Compile, and then Save our Machine.
Wow, look at that! Our first custom Maltego Machine!
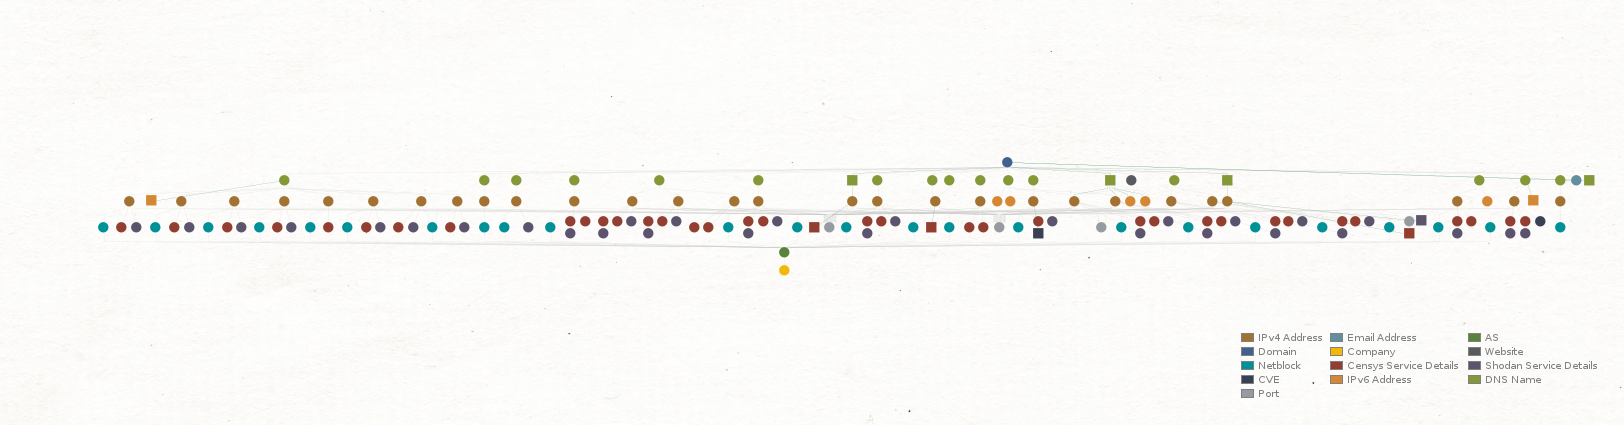
How about trying it out? To do that, open a new graph in Maltego, add a Domain Entity, and select our Machine from the Menu.
That’s it! Let’s pat ourselves on the back, shall we? We have successfully created and run our own attack surface assessments Machine.
To get even more interesting information, you can always tailor the Machine to your liking by adding additional Transforms. I’m sure you already know how to do this.
If you enjoyed this tutorial and would like to explore more helpful content, we invite you to stay up to date with our latest updates by following us on Twitter and LinkedIn, and subscribing to our newsletter.
Happy OSINTing!
About the Author 🔗︎

Mario Rojas 🔗︎
Mario Rojas is a former Cyber Security and Threat Intelligence Subject Matter Expert at Maltego with more than 14 years of experience in the cybersecurity field. His expertise in open-source intelligence (OSINT) allows him to effectively map and visualize complex relationships and connections between entities, from IP addresses and domain names to social media profiles and Darkweb forums.