Person of Interest investigations often require searching through multiple data sources to find information about the person under investigation. The process can involve scouring numerous web pages, professional registries, social networks, and other publicly available or paid sources. Once investigators acquire data, they need to conduct time-consuming data cleaning, analysis, and correlation.
Newly Added: Pipl Data Integration and Transforms in Maltego 🔗︎
With the Pipl Transforms in Maltego, investigators can now streamline their person of interest investigations, vastly reducing the time spent gathering information. Pipl continuously scours the web, social media, and exclusive sources to collect identity elements, as well as other physical and digital data. International data sources add global context for investigators. Pipl’s powerful algorithm performs sophisticated data analysis to deliver an index of more than 3 billion online identities—including names, aliases, addresses, emails, age, work history, relationships, phone numbers and social network details among many other valuable data points.
Click on the anchor links above to jump to the respective section!
In this article, we will introduce: 🔗︎
How Pipl Transforms in Maltego Enhance Person of Interest Investigations 🔗︎
Pipl Transforms integrate seamlessly with the Pipl Data Model, leveraging the power of Maltego to enhance Person of Interest investigations. All that’s needed to get started is any tangible identifier as an entry point. From there, Pipl’s full index of data can be accessed in a matter of seconds.
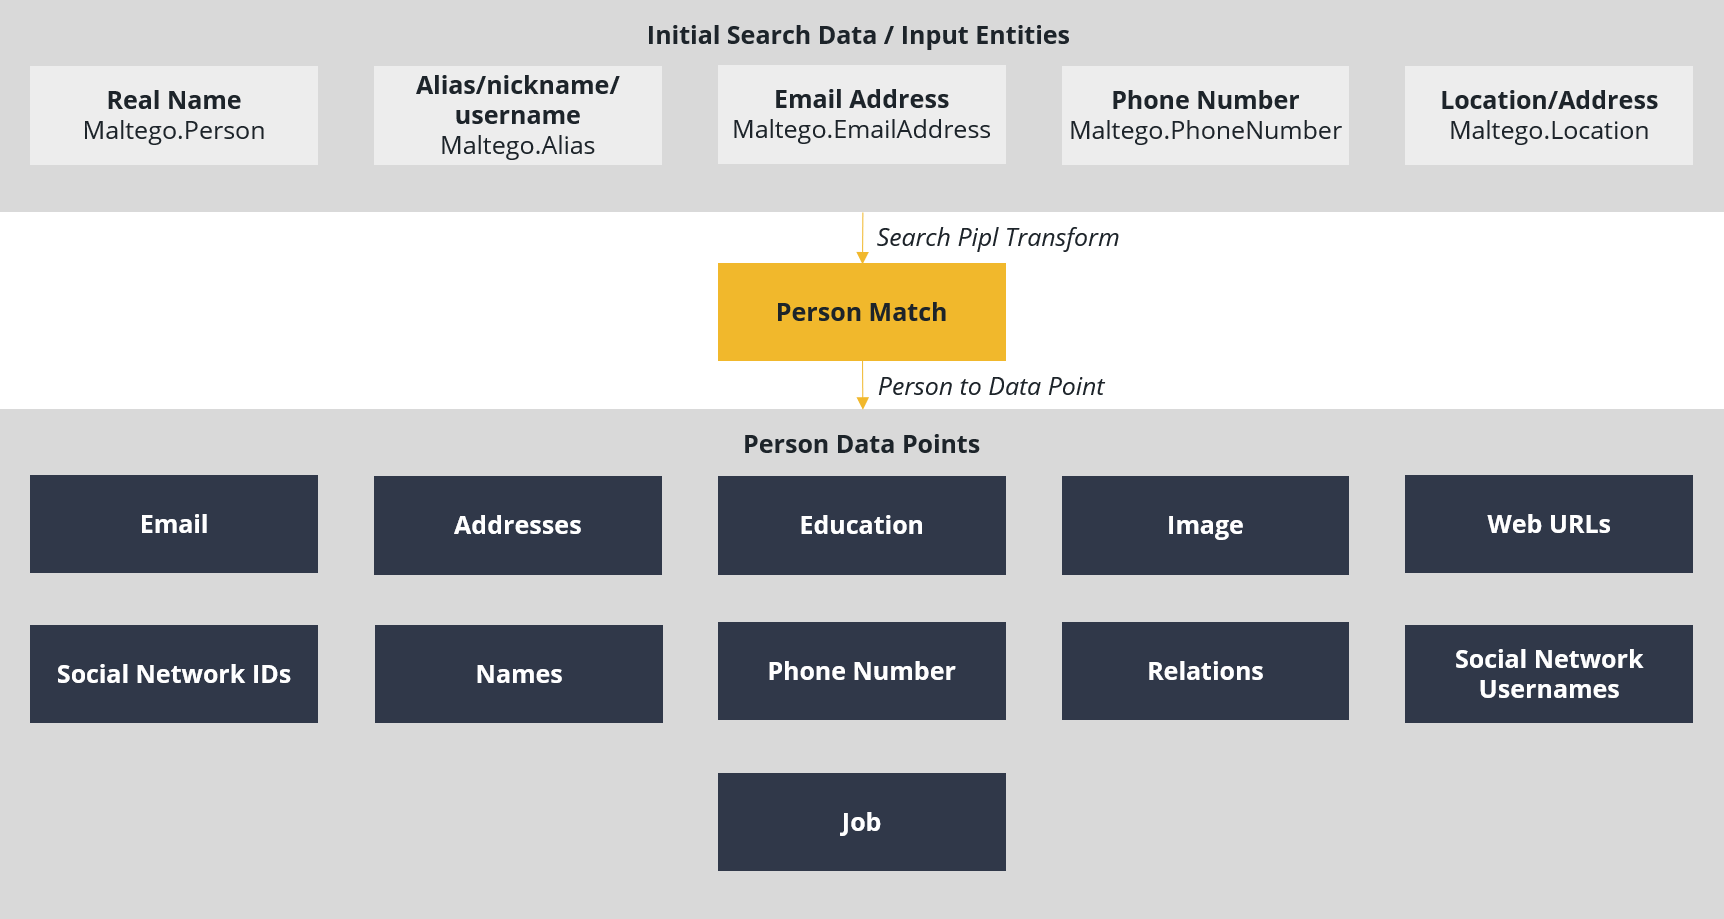
The chart below illustrates the basic flow of an investigation using Pipl in Maltego.
Pipl Queries Return Person Matches and Further Personal Information 🔗︎
Analysts and investigators can search for an initial person match from a given Full Name/Real Name, Alias/Nickname, Phone Number, Email Address, or Physical Address. A search query returns a person match.
From a Person Match, one can search available information for that person. Data points are as follows:
- Addresses: Home and work; current and past addresses associated with the person, including house number, street, city, ZIP code, state and country
- Age: Date of birth, which might be given as a range if the exact date is unknown
- Associates/Relations: Individuals associated with the person, such as co-founders, siblings, parents, or spouse
- Education: Educational qualifications from various schools, colleges, and universities, including the institution, degree, and time period
- Email Addresses: Full Email Addresses, including personal, disposable, and work emails (available on an exact person match only)
- Gender
- Image: URL of profile and other images related to the person
- Job: Current and past jobs, including the period, job title, and organization
- Languages: Languages spoken by the person
- Names: Alternate names, such as maiden names and aliases
- Phone Numbers: Current and past, mobile, landline, pager, home, and office numbers
- Usernames: Online usernames, including screen names, handles, and nicknames from across the web, social media sites, forums and more
- Web URLs: URLs of social media platforms, as well as pages mentioning or containing data about the person (available on an exact person match only)
- Social Network IDs: User IDs from across social media sites
From each data point, such as an Address, it’s possible to identify the data source. If the source is online, Pipl will provide the URL where that data was found.
Now, let’s see how to investigate a person, given various inputs.
Starting a Person of Interest Investigation with Pipl Transforms in Maltego 🔗︎
1. Install the Pipl Transform Hub Item 🔗︎
In the Maltego Desktop Client, type “Pipl” in the search box, or filter by Person of Interest category and Paid connector pricing model to quickly find the hub item.
To access the Pipl Transforms, please email support@maltego.com.
2. Searching for a Person with Pipl Transforms 🔗︎
The initial search data can be any of the following:
- An Alias or user handle on Facebook, Twitter, or Instagram
- An Email address for the person
- A Person’s Name: Since the person might have a common name, a popup enables you to specify location information and narrow the search to be more specific
- A Phone number (specified in international format with a + prefix)
- A physical address of the person (available in the United States only and can even include a house number)
The Two Types of Pipl Person Matches 🔗︎
The Search Person [Pipl] Transform might return with either a Pipl Person Entity or multiple Pipl Possible Person Entities.
Pipl Possible Person Entities appear with an orange dot overlay. Results are sorted by the Match score—a value between 0 and 1—representing the confidence level that each person is the person of interest in an investigation. Each possible person includes summary data and a search pointer—similar to a bookmark—for follow-up searches to expand the person with more detail.
The Search Person [Pipl] Transform will result in a Pipl Person Entity (with a green dot overlay) only when Pipl matches the search parameters to a single, real-world person. This usually happens when your search is unique enough, like searching by an Email Address or a unique name.
See below for an illustration of “Possible Person” matches (left) and full Pipl Person match (right).
The person’s age, if present, will be shown above the person icon, and the overlay icon denotes the person’s gender—blue if male and purple if female.
For example:
It is possible to enhance a Possible Person to a Person result by running the Resolve Search Pointer [Pipl] Transform, a step we will be covering later in this article. For now, it’s important to note that Transforms run on a Possible Person may return incomplete or less accurate results than a full Pipl Person.
Pipl Transform Walkthrough: Searching for a Person with Initial Inputs 🔗︎
Let’s look at how the Transforms work using a fictional character, Clark Kent. The Transform run results in this walkthrough have been manually altered for illustrative purposes, so your results may vary.
1. Search Person Using Alias/Nickname 🔗︎
Take an Alias Entity and set the input value clark.kent and run the Search Person [Pipl] Transform under Pipl Transforms.
2. Search Person Using Address 🔗︎
Searching by an address requires additional information to return precise results since people frequently change residences. Let’s take a Pipl Address Entity and set the following properties:
- Raw Address to 1000-355 Broadway, Metropolis, Kansas
- Country and Country code to US
- Kal El as the name under the optional Required inputs
3. Search Person Using Phone Number 🔗︎
The input phone number should contain the + (plus) sign and be in international number format. Phone numbers can be recycled or be connected to multiple people, so it’s possible for a phone number to return multiple possible persons. However, if the phone number has belonged to one individual throughout its lifetime, the Transform will return an exact Person match.
4. Search by Email Address 🔗︎
Email Addresses are usually unique per person. In most cases, searching for a person with an Email Address returns a definite Person match, as shown below.
5. Search Using Full Name 🔗︎
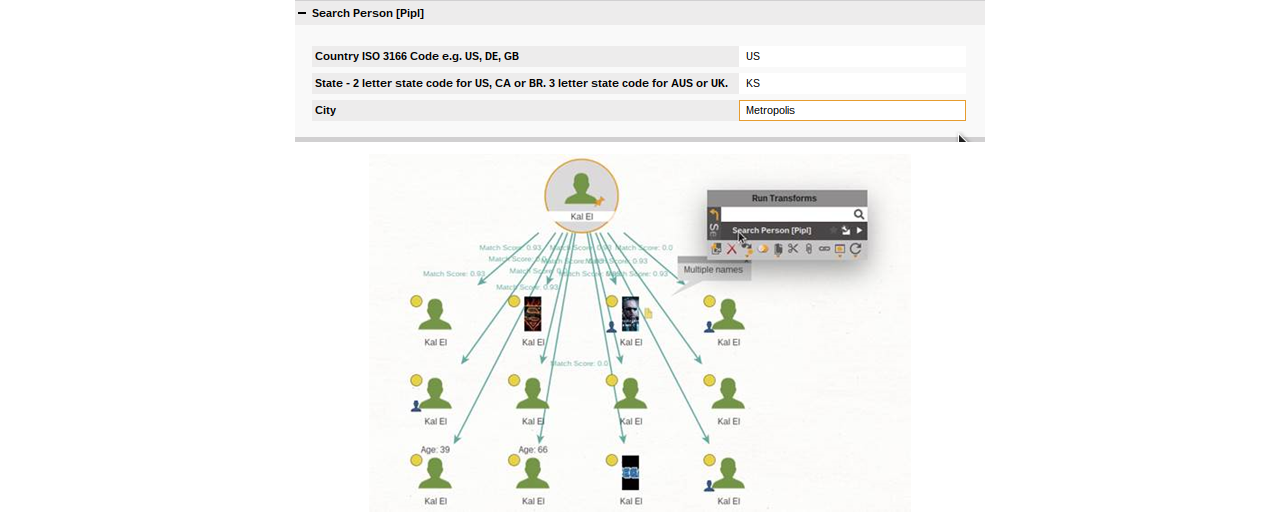
The final method is to search by an individual’s name. Using a Person Entity as input, set the input value Kal El. To narrow down the search, add the country: US, state: KS, and city Metropolis.
Names are common around the world. To get better results, it is best to input additional address information.
Find More Personal Information from a Person Result 🔗︎
Continuing from our previous search via full name, we will now take the Possible Person results, find the definite Person match, and uncover more personal information of the person of interest.
Resolving a Possible Person Search Pointer to a Person Result 🔗︎
The first Entity result has an orange circle overlay, indicating it is a Pipl Possible Persons Entity, which will now be enhanced to a definite Person match.
It is possible to get information about a person without resolving the search pointer, but emails, URLs, and other information specific to that person would not be available. To get the most possible data, it’s always recommended to first resolve a possible person search pointer by running the Resolve search pointer [Pipl] Transform before running person data Transforms.
Pipl Person/Pipl Possible Person to Available Person Data 🔗︎
From a Person or Possible Person Entity, you can look up a person’s available information by running the corresponding Transforms from the “Expand Details” Transform set. You can also simply expand all available details using “Expand in Full [Pipl]”. Among other things, Pipl may return any of the following information:
- E-Mail addresses
- Phone numbers
- Address information
- Alternate names and online aliases
- Family members and other associated people
- Job and education history
In the next sections, we will cover just a few of these detail Transforms more closely to explain their usage and further pivots.
To Education [Pipl] and To Institute [Pipl] 🔗︎
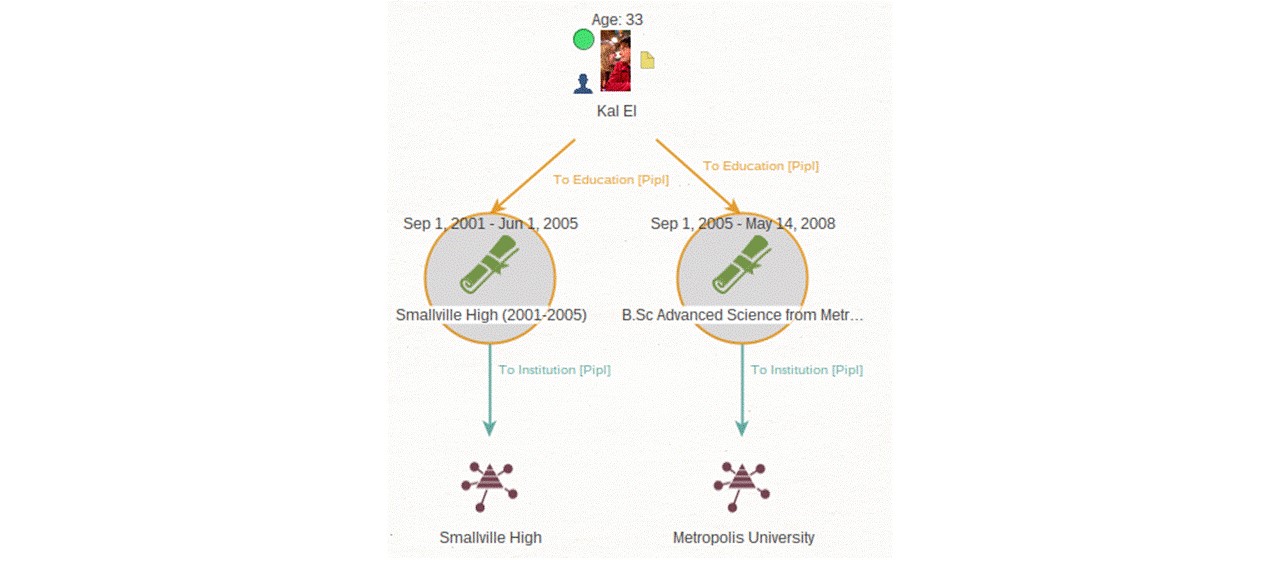
Let’s start with the To Education [Pipl] and the To Institute [Pipl] Transforms. The duration of study is displayed above the education icon and is also present in the Education Entity properties.
To Emails [Pipl] 🔗︎
Other important data points in investigations are emails. To look these up, we use the To Emails [Pipl] Transform. Emails are categorized by type—personal or business as seen below—and are available on an exact Person match only.
To Job [Pipl] and To Organization [Pipl] 🔗︎
Pipl also provides career records. Run the To Job [Pipl] Transform, and with the result Entity, run the To Organization [Pipl] Transform to return the Company where the person worked.
To Social Networks [Pipl] and To Usernames [Pipl] 🔗︎
Social networks play a key role in Person of Interest investigations, because they can be used to correlate and link usernames and IDs across the web. Two Transforms can be useful during social network recon: To Social Networks [Pipl] Transform and To Usernames [Pipl] Transform.
To Source Origin [Pipl] 🔗︎
For each data point returned by Pipl (with the exception of E-Mail addresses), an investigator can look up the source of the data by running the To Source Origin [Pipl] Transform.
For a given Source, if an online source, we can look up the original URL where the data was found. This can be especially helpful if we want to run further Transforms on the source, like extracting other Entities or historical snapshots.
To Tags Transform Set 🔗︎
Additionally, we can look up tags. Tags are contextual data about a Source, such as industry for work related sources, or birthdates. Tags are another great source of personal information and can be used to gain insight in skills, interests, and hobbie, as well as vehicles previously owned by a person. They also come with their own “To Tags” Transform set.
Expand in Full 🔗︎
These Transforms are useful in pivoting out to specific information about a person. This helps investigators keep the graph uncluttered. Sometimes you want to be sure that you didn’t miss anything.
To easily retrieve all the information available about a person match, the previously mentioned Expand in Full Transform can be used.
Utilize Pipl Transforms in Maltego for More Comprehensive Person of Interest Investigations 🔗︎
For all Transforms, we recommend always resolving a possible person using the search pointer and then running subsequent Transforms on the definite person match in order to work with the most complete set of results.
Note also that the various Pipl Entities tend to inherit from standard Entities, which makes it possible to run many Standard Transforms as well as Transforms from other Maltego data integrations to easily pivot into other investigative paths.
Pipl Transforms are available for purchase for both enterprise and individual investigators. To gain access to these Transforms or for more information, contact our team at support@maltego.com or refer to our Pipl Transform Hub page here.
Don’t forget to download and watch our Pipl webinar, where we deep dive into a practical use case of using Pipl Transforms in Maltego for company due diligence processes.
We hope you’ve enjoyed this walkthrough of our new Pipl Transforms. If you have any questions or feedback, please feel free to contact us via Twitter or LinkedIn or visit our Support site.
Subscribe to our email newsletter to stay updated on new use cases, tutorials, and product development!
Happy investigating!


 4.5 rating


