One of the routine tasks Maltego is used for by analysts and experts worldwide is infrastructure footprinting on an organization’s network.
Also known as reconnaissance, footprinting is the technique employed to gather information—such as IP addresses—regarding a specific network environment, usually with the purpose of revealing vulnerabilities, indicators of compromise, and hidden weak points as well as improving upon the current network policies and detection rules.
In this tutorial, we detail a network footprinting methodology while demonstrating how investigators can use Maltego to implement it. We will also show how users can significantly simplify and automate the network footprinting process with the use of Maltego Machines.
Maltego’s Network Footprinting Methodology 🔗︎
When footprinting a domain, the goal is to find as much information about its underlying infrastructure as possible. However, when dealing with a large footprint, it can be quite difficult to know when you have found all publicly available information about the domain under investigation.
To make the process a little easier, we have created a structured methodology that we follow when conducting a network footprint in Maltego.
Using Maltego Transforms to Map Network Infrastructure and Perform Network Footprinting 🔗︎
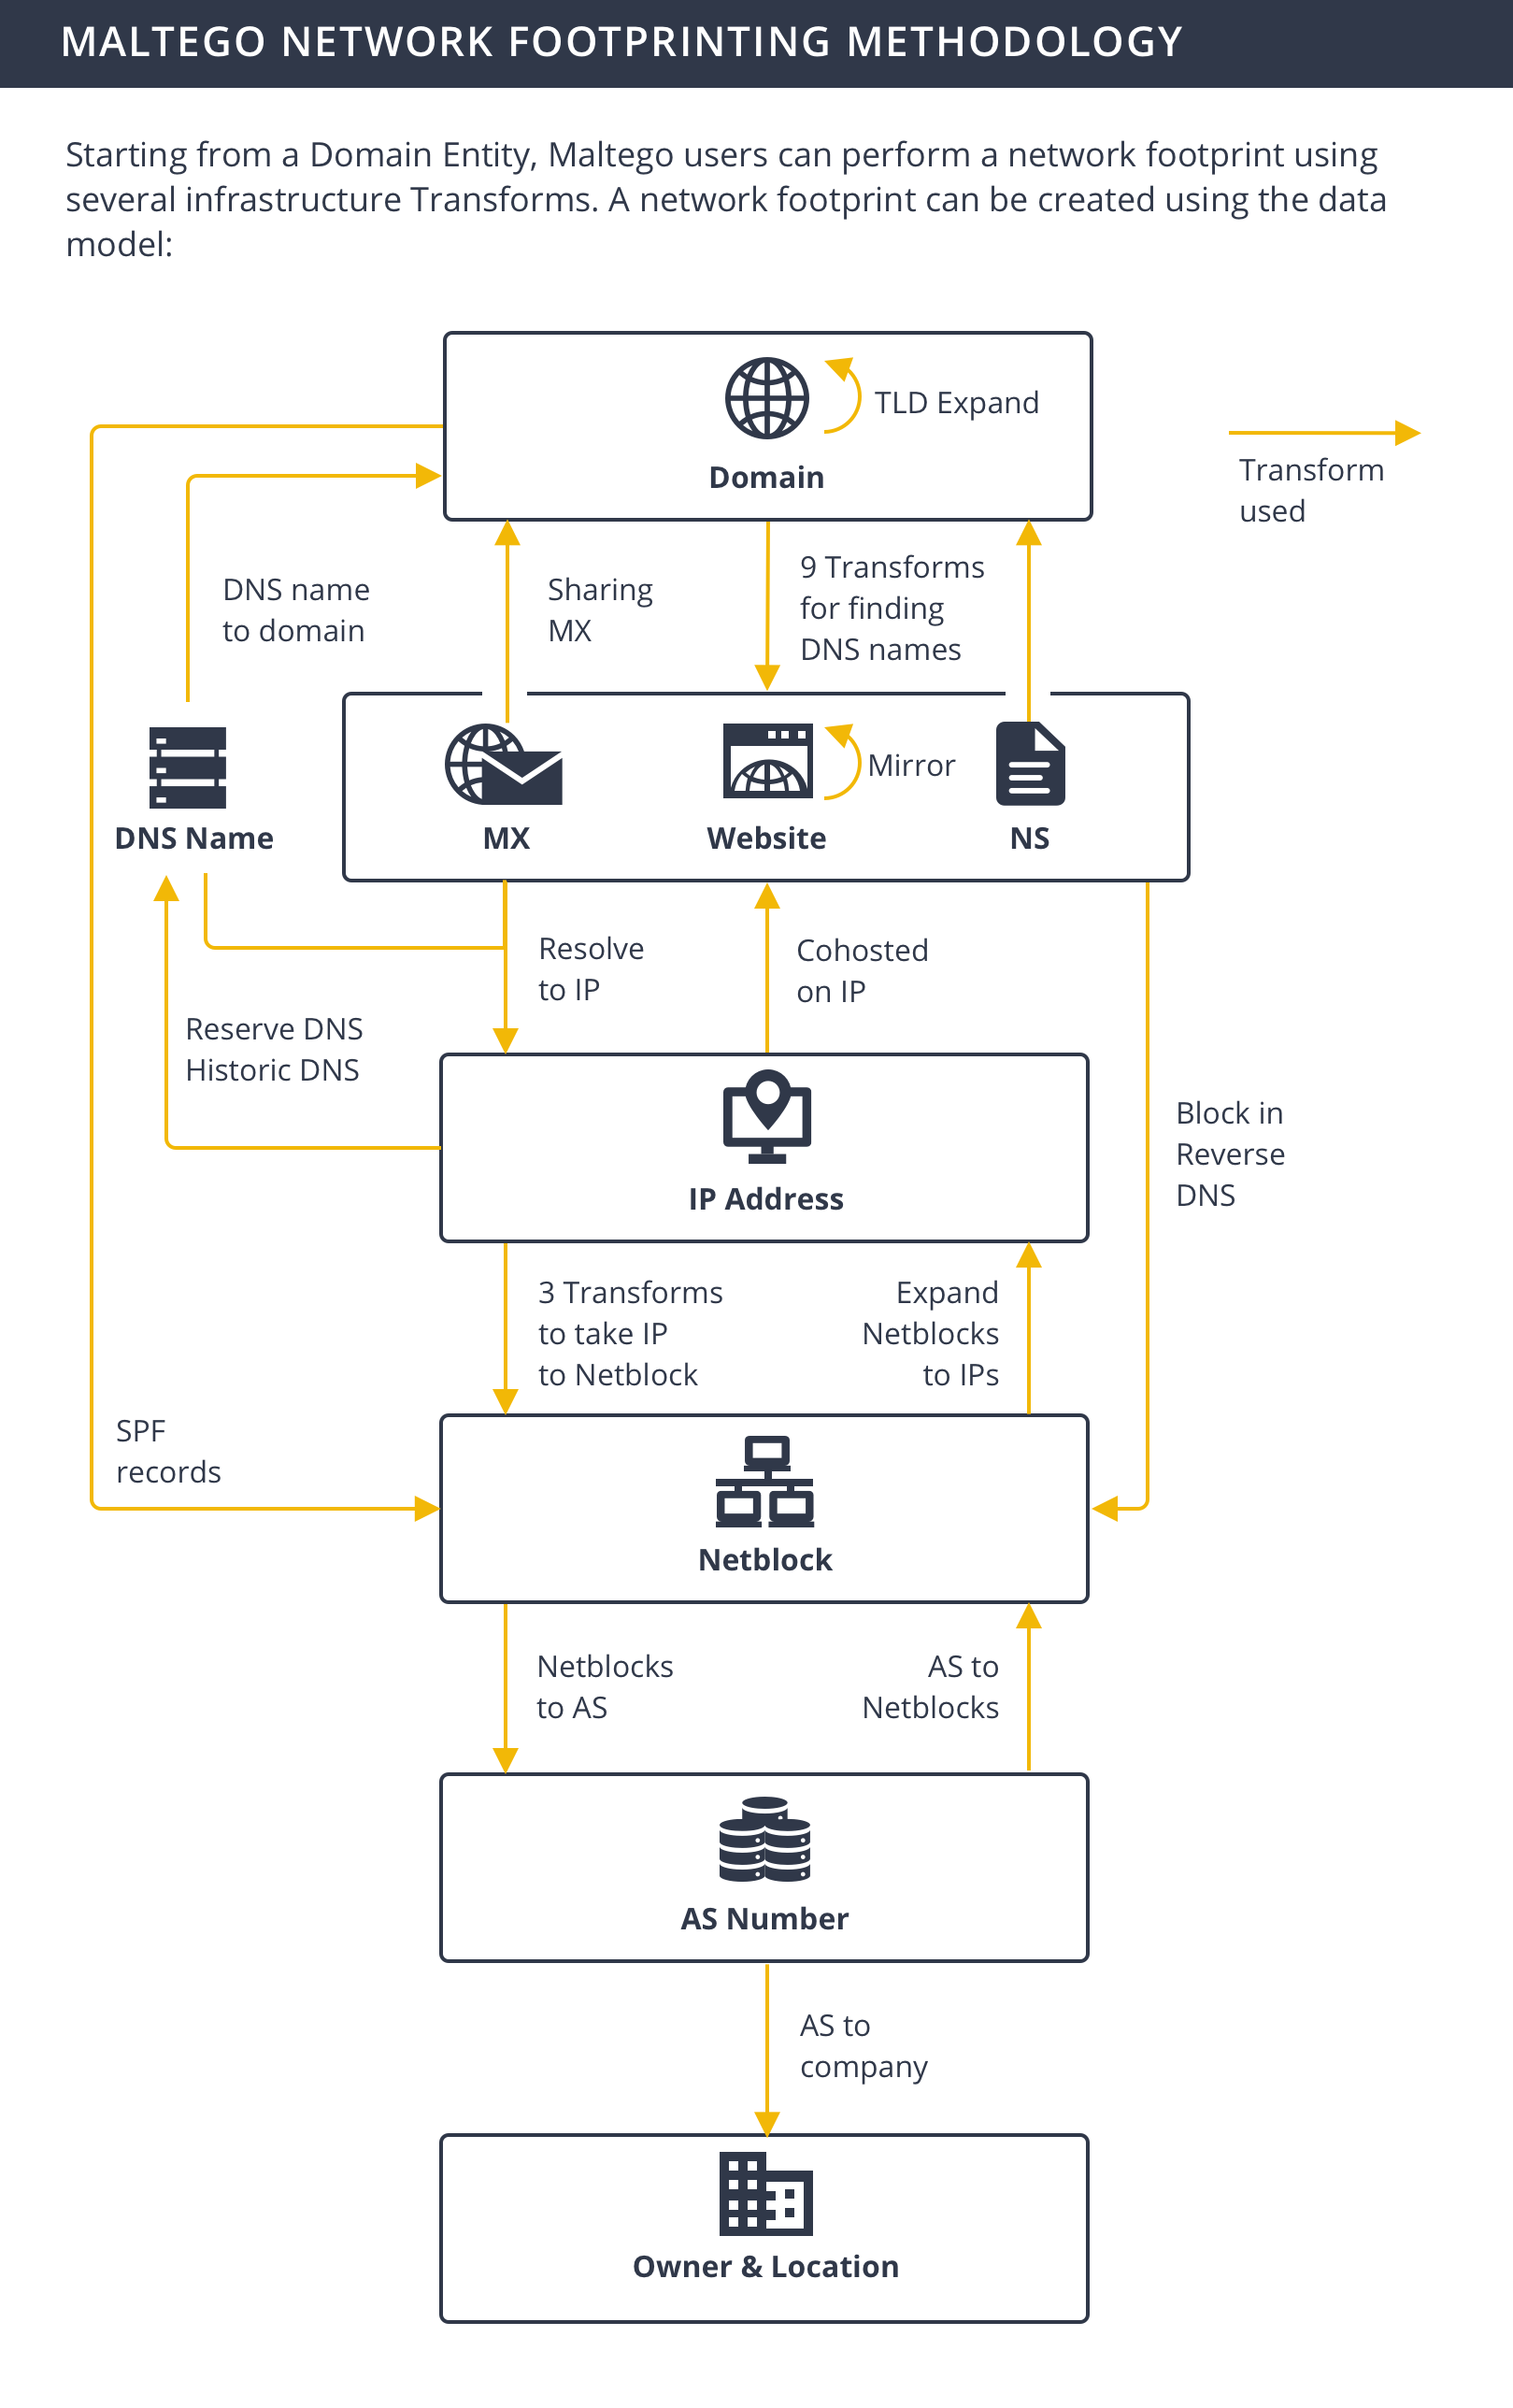
Maltego has a number of Transforms that pull infrastructure data easily from OSINT and third-party data sources for network footprinting. When returning the query results, the Transforms also map out the relationships between each of the data points and visualize the infrastructure in a graph.
In the data model above, the arrows are labeled with the Maltego Transforms that can be used to find such information.
Next, we will walk you through a real-life network footprinting demonstration following the data model in Maltego.
Watch this five-minute video to learn how the process works in Maltego:
Step 1: Find Related Top-Level Domains (TLD) 🔗︎
Starting at the top of the model with the target domain, we see an arrow labeled “TLD Expand” pointing from a domain back to a domain. This step searches for top-level domains that belong to the target organization, a step that allows analysts to grasp the overall, interconnected infrastructure—especially in an international organization.
Top-level domain refers to the last part of an URL. For example, the “.com” in the domain “maltego.com” is the top-level domain. In the Maltego Desktop Client, the To Domain [Find other TLDs] Transform returns all top-level domains (TLD) related to the target domain.
For example, we ran the To Domain [Find other TLDs] Transform on the linkedin.com domain. The Transform returned 101 Domain Entities, including linkedin.asia, linkedin.de, linkedin.io, and more.
![To Domain [Find other TLDs] Transform](/images/uploads/network-footprinting-001.png)
Step 2: Find DNS Names Related to The Target Domain 🔗︎
Once the top-level domains are enumerated, we want to find the DNS records (names) from the DNS server’s database. This includes obtaining the domain’s MX records, NS records, and as many A records as possible.
A mail exchanger (MX) record specifies the mail server responsible for accepting email messages on behalf of a domain name. NS records tell the Internet where to go to find a domain’s IP address. An A Record is used to point a logical domain name, such as “google.com”, to the IP address of Google’s hosting server, “74.125.224.147”
In Maltego, there are nine Transforms for finding DNS names related to a domain. You can find them in the Transform set “DNS from Domain” which is part of the Standard Transforms Hub item.
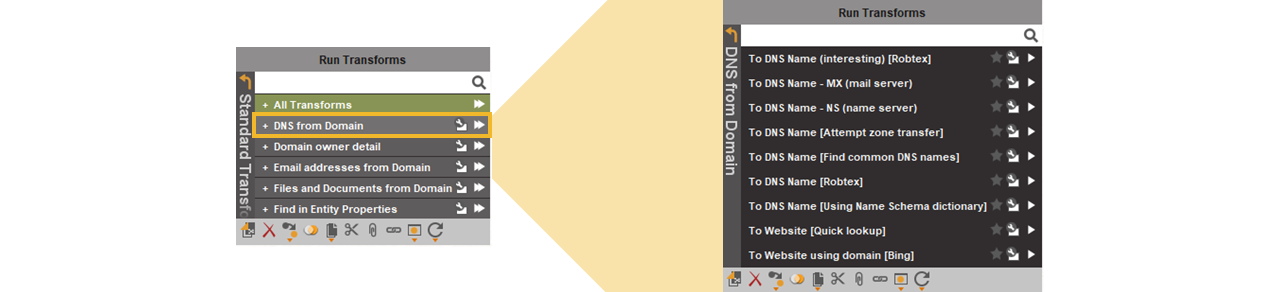
Running the “DNS from Domain” Transform set on this domain by clicking the fast-forward icon, returns the results seen in the graph below. For the purpose of this demonstration, we limited the number of results returned by each Transform to 256.
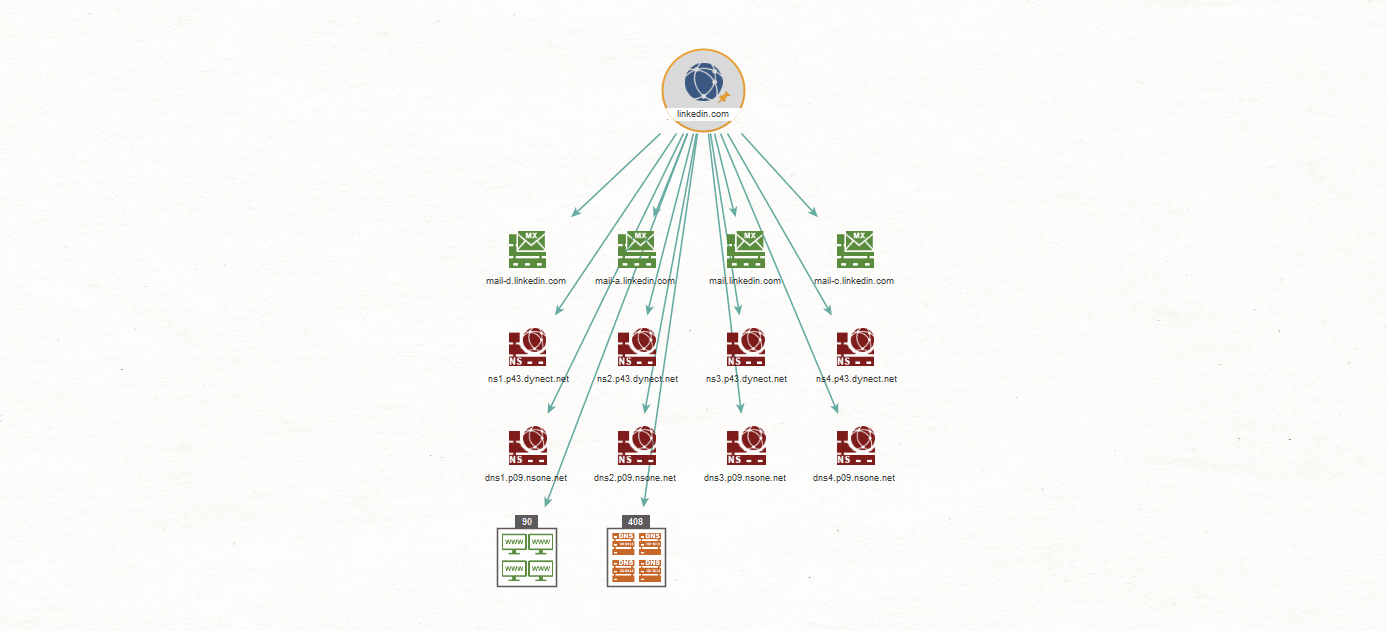
Note that there are 408 Entities in the DNS name collection node, indicating a large infrastructure with a wide attack surface.
Taking a look at the data model again, we see that there are three Transforms going from the DNS Name level up to the TLD level. Two of these Transforms look for domains that share the same name servers (NS) or mail servers (MX) that have been found from the original domain. The third Transform simply extracts the domain from that DNS name.
Step 3: Resolving DNS Names to IP Addresses 🔗︎
Next, following the data model, we will resolve all the DNS names to IP addresses, by selecting the DNS Entities and running the To IP Address [DNS] Transform.
![To IP Address [DNS] Transform](/images/uploads/network-footprinting-004.png)
It is interesting to note here that 304 of the 408 DNS names resolve to a single IP address, as shown in the image above. Of the remaining 104 DNS Entities, 45 did not resolve to an IP address at all. This might be an indication of old DNS names or DNS names that resolve to internal resources configured on a split DNS system.
Now that we have an IP address, we can go back up a level in the data model to find more DNS names related to the IP addresses. This can be done by looking at historical DNS records collected from passive and reverse DNS data.
Alternatively, we can use the Maltego Dorking technique by querying Bing to see what other websites have been seen resolving to the same IP address—aka the “IP:” trick.
Step 4: Finding the Netblocks where the IP Addresses Belong 🔗︎
From the IP addresses, we next want to find the netblocks that the addresses belong to and determine whether the entire netblocks belong to our target organization.
Netblocks refer to ranges of IP addresses that are owned and managed by Internet Service Providers (ISPs) or data centers. An IP netblock provides details about the owner of the entire IP range as well as its administrative contact, organization, and more.
In Maltego, there are three Transforms for finding netblocks from an IP address and it is important to understand how each of them work:
- To Netblocks [Using natural boundaries]: This Transform will sort IP addresses into netblock sizes specified by the user. Note that it is important to configure the correct size of the netblock to conduct accurate investigations.
- To Netblocks [Using routing info]: This Transform determines the netblock that an IP address belongs to by looking up its routing table information.
- To Netblocks [Using WHOIS info]: This Transform will look up the Netblock for an IP address by querying the registrars.
Running the To Netblocks [Using WHOIS info] Transform on our network footprinting demonstration results in the following image:
![To Netblocks [Using WHOIS info] Transform](/images/uploads/network-footprinting-006.png)
![To Netblocks [Using WHOIS info] Transform](/images/uploads/network-footprinting-007.png)
The images above show only a portion of the resulting graph.
Validate Whether the Netblocks are in the Target’s Infrastructure 🔗︎
Once we have these netblocks, it is important to validate that we are still looking at our target’s infrastructure and have not included IP space belonging to “innocent by-standing” organizations.
One way to do this is to run the To DNS Names in netblock [Reverse DNS] Transform on the netblock and then manually inspect whether or not the block belongs to the target by looking at the (reverse) DNS names returned.
Running this Transform on the netblock “199.101.160.0-199.101.163.255” returned 157 new DNS names.
![To DNS Names in netblock [Reverse DNS] Transform](/images/uploads/network-footprinting-008.png)
By manually inspecting these DNS names, it is quite easy to see that they all belong to our target organization, confirming with near certainty that the entire netblock does in fact belong to our target.
In this step, we have also found more DNS names related to our target. Steps 3 and 4 can be repeated here to uncover more pieces of the infrastructure.
Step 5: Discover the Autonomous Systems (AS) Numbers 🔗︎
After confirming that the netblocks are accurate, we can have a look at the Autonomous Systems (AS) that they belong to. An autonomous system number is necessary for any interconnection between two autonomous systems, such as peered networks at Internet exchange points. We can then determine whether the entire AS is in fact owned by our target organization.
First, we run the To AS Number Transform on the netblocks we have.
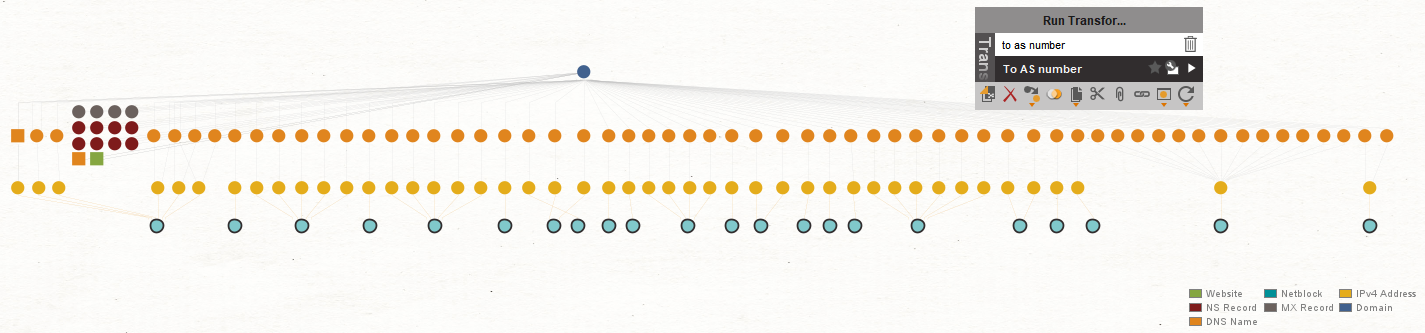
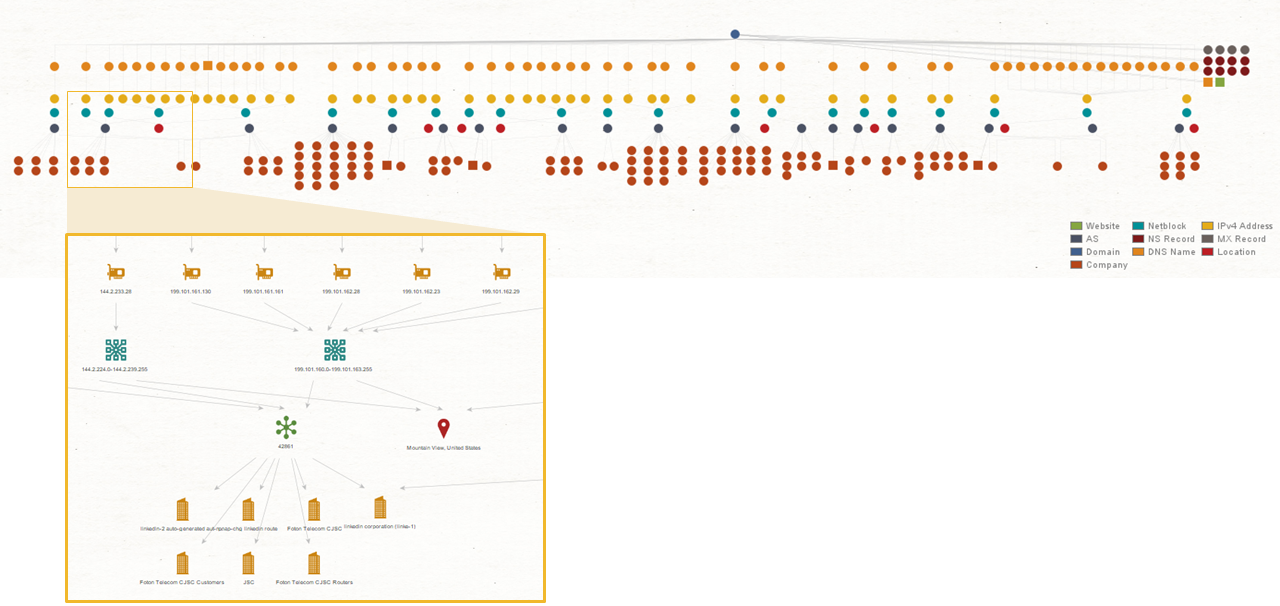
After that, we then run the To Company [Owner] Transform to see who owns the AS. In this demo, this results in seven AS-es being returned that belong to the LinkedIn organization.
![To Company [Owner] Transform](/images/uploads/network-footprinting-010.png)
The result is shown in the image below.
Step 6: Moving Back Up the Data Model to Find More Information 🔗︎
At this point, we have reached the bottom of the data model. The next step would be to take the AS-es we found and start moving back up the data model to find more related information at each level.
First, we query to return all the netblocks found from the AS-es and from these new netblocks, we would then find more DNS names by querying historical or reverse DNS records. To do this, we run the To DNS Names in netblock [Reverse DNS] Transform.
![To DNS Names in netblock [Reverse DNS] Transform](/images/uploads/network-footprinting-012.png)
From the new DNS names returned, we could potentially find more domains belonging to the target and then start the whole process again on the new domains.
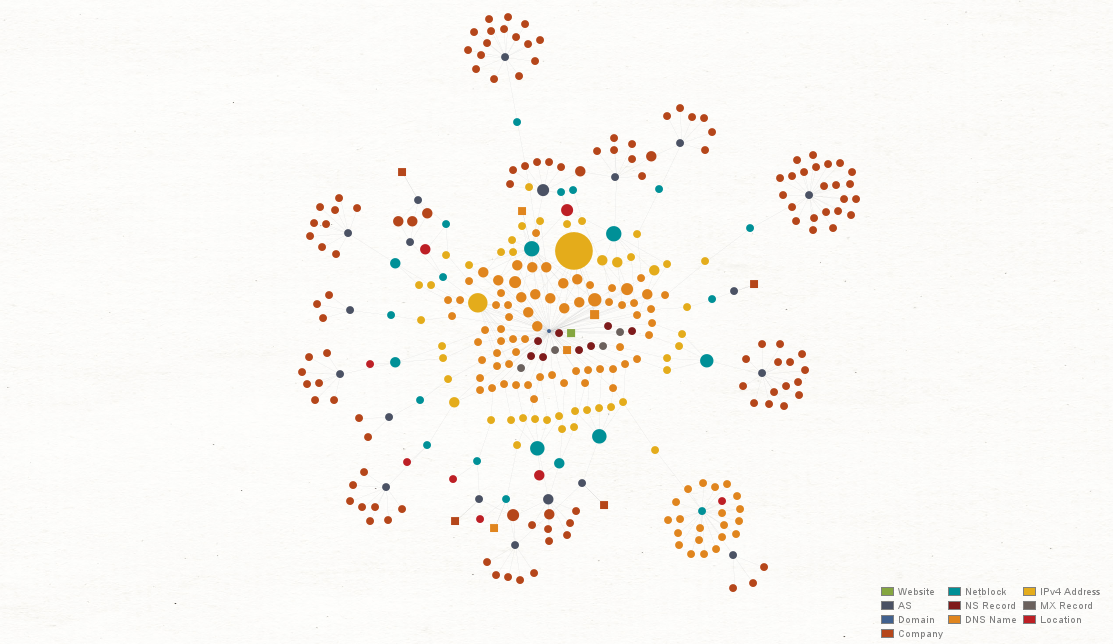
As our network footprint proceeds further, our graph also becomes more and more complicated. To easily identify the most connected parts of the network as well as its outliers, we can select the “Ball Size by Links (Incoming)” view at the left tool bar. This view adjusts the size of each Entity based on the number of incoming links.
Maltego Machines: Automating Repetitive Steps in Network Footprinting 🔗︎

An important aspect to realize here is that a network footprint is a cyclical process, not a linear one—and you are never done. You just give up. (Just kidding!)
The simplest network footprint you can perform would be to go from the top of the data model to the bottom without moving up the model at any stage. However, to extract the most data from a network, it is common to move up and down the data model as the footprinting proceeds.
Fortunately, it is not required to remember every step of the footprinting process thanks to the Maltego feature: Machines.
Maltego Machines allow you to script Transforms together and have them run sequentially in an automated fashion. Read more about Maltego Machines for network footprinting in this article here.
Perform Your First Network Footprint with Maltego 🔗︎
The demonstration shown in this tutorial provide one possible strategy to conduct a network footprint in a structured and repeatable way.
If you are just getting started with Maltego, check out our step-by-step tutorial—Beginner’s Guide for Basic Network Footprinting in Maltego.
Download this infographic and network footprint data model and share with your friends, family, and colleagues!
Follow us on Twitter and LinkedIn or subscribe to our email newsletter to stay updated on our latest tutorials, use cases, and webinars!