

Maltego graphs all start as a blank canvas. However, they often extend to include hundreds or even thousands of Entities. The larger the graph, the more challenging it is to analyze and understand its content. Of course, using Layouts or Search functions will allow you to grasp some information and better interpret your graph, but Views are the truly invaluable tool that will allow you to figure out what the data in your graph contains.
Layouts change how information is structured; Views change how Entities are displayed.
In Part 1 of this article series, we introduced what Maltego Views are and how to set up a basic View in Maltego.
In Part 2, we will demonstrate how to use the advanced functions (such as Entity properties and links) to create Views that present data in a relevant way for you.
Lets dive right in.
Part 1: Introduction to Views and the Basics of Setting Them Up Part 2: Writing Bindings for Your Views Part 3: Useful Tips for Leveling Up Your Bindings and ViewsMaltego Views and How to Use Them 🔗︎
Obtaining Information From The Entities In Your Graph 🔗︎
The main functions we will use to obtain information from the Entities on your graph are:
- isType()
- hasProperty()
- getPropertyValue()
isType() will help us do a first selection of our Entities based on Entity type. Usually, one binding is dedicated to one Entity type in order to avoid having bindings containing large amounts of codes. Please note that this function takes into account the inheritance of Entity type. For instance, isType(“maltego.DNSName”) will return True for a maltego.DNSName Entity, but also for a maltego.Website Entity as this is a particular type of DNS name.
hasProperty() is what we will use right before getPropertyValue(). This is to test if an Entity has a particular property, it is particularly useful when working on dynamic properties Entities that may or may not be present in the Entities in our graph.
getPropertyValue() is our bread and butter: It will give us the value of an Entity’s property given we have the right key. Without getting too technical, the key of an Entity is simply its name. - not the name that is usually displayed on the Maltego Desktop Client, rather a name that is used internally by Maltego.
Here is how you would go about obtaining it:
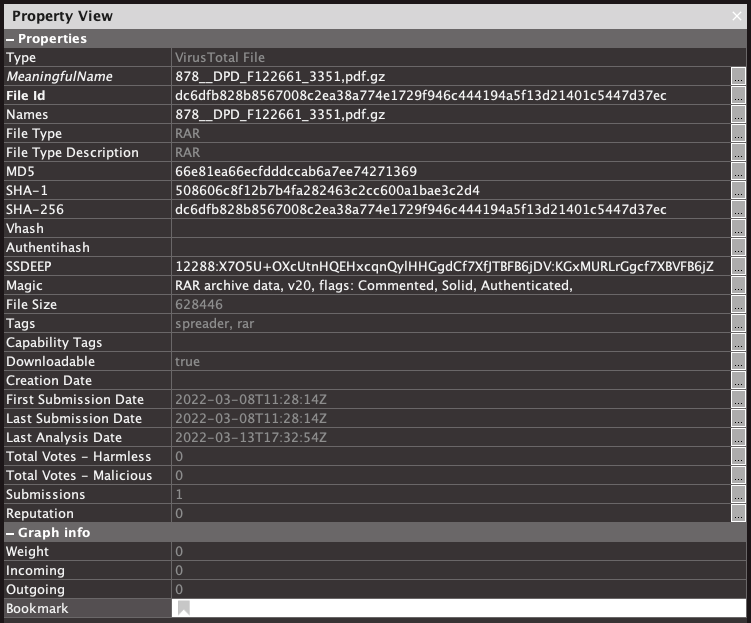
This is the Property View of a VirusTotal Entity sample. We wish to write a View highlighting the date of first submission. To do so, we need to use getPropertyValue() and we need the key to this property.
To obtain the key, simply do a right click on the property and tick the Show Description Area box. This will add 2 lines at the bottom of the Property View window:
- One contains the name of the Entity
- The other one contains the key we need, also known as Property ID
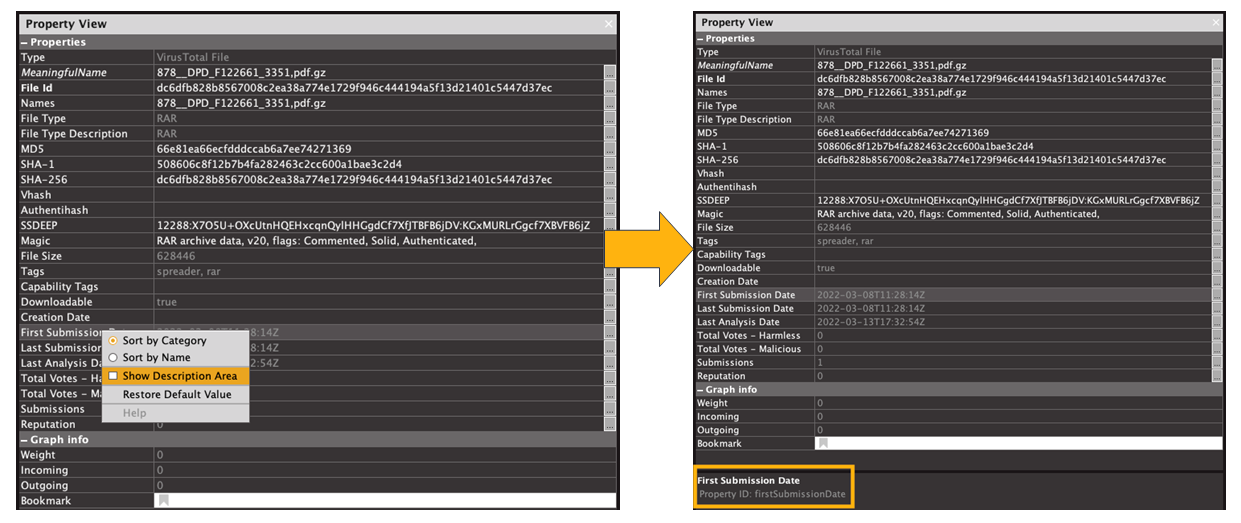
This is the same name we would use to write a Transform or a Machine. To obtain the value of this property in a View, call getPropertyValue() with this string of character as argument.
getPropertyValue('firstSubmissionDate')
Ideally, we would want to test the presence of this property first. Which would be done by using the hasProperty() function.
if (hasProperty('firstSubmissionDate')) {
    getPropertyValue('firstSubmissionDate')
}
Moreover, we would need to verify that we only consider VirusTotal samples, not just any Entity that has a property named like this. Let’s test out the type with isType():
if (isType('maltego.virustotal.File'))  {
    if (hasProperty('firstSubmissionDate')) {
        getPropertyValue('firstSubmissionDate')
    }
}
The type of Entity can be obtained by selecting this Entity and reading its description in the Detail View window.
We now have properly extracted the value of a property. The last thing we need to do is to manipulate its value into an output that will be used by Maltego to set the Entity’s color or size. We will detail the specifics of both types of bindings in the next sections.
Size Binding 🔗︎
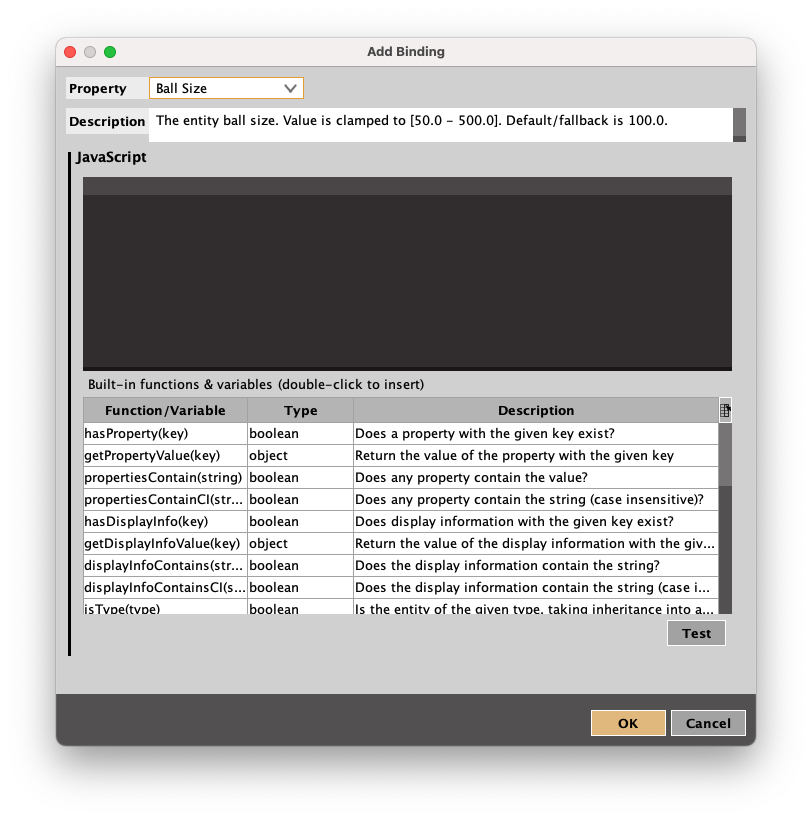
This binding expects a number to be output. As the description box reads, the size of an Entity is clamped between 50 and 500.
This is a first challenge for us.
getPropertyValue('final_balance')
Take the following View highlighting the number of BTC in an address as an example:
Because the return value is comprised between 50 and 500, any amount inferior to 50 will be automatically brought to 50 when interpreted by Maltego to represent the size of the Entity. With this approach, any address with a balance between 0 and 50 BTC will be the same size! This is a shame, considering that at the time of writing, 50 BTC were worth a bit more than a million dollars! Moreover, any address with 500 BTC or more will be represented by a ball the same size, whether it contains 500 or 50,000 BTC.
To avoid this problem, most size bindings in Maltego use the following function: The logarithm! This function will “flatten” the values for us. Let us use it on our binding:
(1 + 1.5 * Math.log(getPropertyValue('final_balance'))) * 50
In this example, we add 1 to the log and multiply by 50 to be able to reach our interval faster: Without this, we would reach 50 with a balance of 1050 BTC! With these modifications, 1 BTC will bring us to 50, 10 to 125, 100 to 200 and so on.
The idea is that most values, from the smallest to the largest, will have a different output when passed through this function. However, this is only a good approach if we expect a wide range of values in this property.
If we wanted to do the same thing with the age of a person, this approach would make our View useless, as most people’s age is comprised between 0 and 115, our ball sizes would never reach 200, leaving the 200 to 500 range unused. In this case, it would be better to drop the logarithm and multiply the age by 4 to occupy the entire range. We will also add 50, else the children from age 0 to 12 will be represented with the same ball size (as 0 x 4 = 0 < 50 and 12 x 4 = 48 < 50).
This would give us the following binding, which is much more adapted to a smaller range of possible values.
50 + 4 * getPropertyValue('age')
Color Binding 🔗︎
A RGB hex code is a # sign followed by 6 digits or letters that indicate a particular shade of color. For example, #808080 indicates grey while #FF0000 is bright red. To find the RGB triplet of a particular shade, simply google it or use a freely available online tool.
The main problem we face with this binding is that unlike the previous one, we cannot just pull a numerical value and slightly tweak it to match our range. Most often than not, color bindings are not best suited to underline a range of values, as they are only here to highlight a set of Entities based on specific criteria.
To build on the previous example, if this time we want to highlight individuals that are legally considered adults (with an age above 18), we would use the following View:
if (isType('maltego.Person'))  {
    if (hasProperty('age')) {
        if (getPropertyValue('age')>=18) {
            "#FF0000"; // RED
        }
        else {
            "#0602f5"; // BLUE
        }
    }
}
else {
    "#808080"; // GREY
}
After testing if the Entity is a maltego.Person Entity, the binding code checks if the Age property is present and then checks if the age is equal to or greater than 18. If the age is indeed greater than 18, the code returns #FF0000 (red), showing the relevant Entities in red. Otherwise, it returns #0602F5 (blue), showing the relevant Entities in blue. Entities that are not Person Entities will be colored in grey (#808080). Do not omit the semi colon “;” after the string you wish to output.
There is a fundamental difference with the binding in the previous example: While the previous example allowed to grasp the general age repartition of the population on your graph at a glance, the color binding will help quickly isolate the minors and the adults in your graph. But you will not be able to obtain the medium age of the population. Therefore, combining both bindings can be a good idea to gain a better understanding of your graph.
Please note that the Age property in this example is a dynamic (custom) property and is not present by default in the Entity.
Testing Your Bindings 🔗︎
Whichever bindings you choose to add to your View, you should test it extensively. To do so, click on the Test button below the list of functions in the Binding Editing window. This will display a window similar to the following:
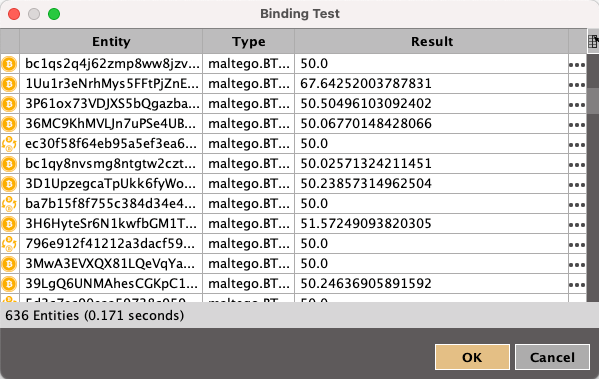
You will be able to find a list of the Entities in your graph, the Entity types, and what this binding gives as an output when this Entity serves as an input. Sometimes, the Result column will contain an error message written in red. Click on the ellipsis to better visualize the message.
In Part 3 of this article series, we will share even more useful tips and tricks that you can use to take your Bindings and Views to the next level.
Happy Investigating!