

Maltego graphs all start as a blank canvas. However, they often extend to include hundreds or even thousands of Entities. The larger the graph, the more challenging it is to analyze and understand its content. Of course, using Layouts or Search functions will allow you to grasp some information and better interpret your graph, but Views are the truly invaluable tool that will allow you to figure out what the data in your graph contains.
Layouts change how information is structured; Views change how Entities are displayed.
In Part 1 of this article series, we introduced what Maltego Views are and how to set up a basic View in Maltego.
In Part 2, we demonstrate how to use the advanced functions (such as Entity properties and links) to create Views that present data in a relevant way for you.
In this article, we will share some tips and tricks to help you level up your Bindings and Views even further.
Lets dive right in.
Part 1: Introduction to Views and the Basics of Setting Them Up Part 2: Writing Bindings for Your Views Part 3: Useful Tips for Leveling Up Your Bindings and ViewsMaltego Views and How to Use Them 🔗︎
Using a Catch-All 🔗︎
Something that might have escaped the readers of this article is that it is possible to have more than one binding in your View. Maltego applies them in a descending order: The binding at the top of the list will be applied on every Entities in the graph, then the next binding of the same type (size or color) will be applied to the Entities that did not get a result from the first binding.
For example, let us consider this graph.
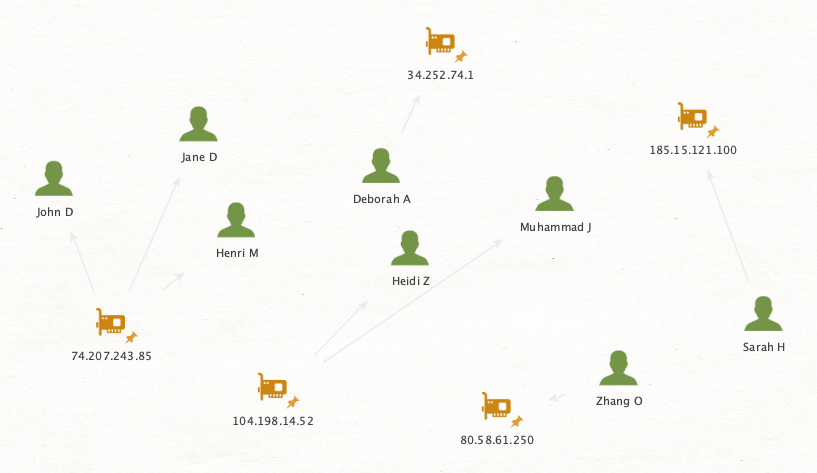
We have 8 Person Entities linked to IP addresses. We wish to check which persons are minors. We can do this with the following binding:
if (hasProperty('age')) {
    if (getPropertyValue('age')>=18) {
        "#FF0000"; // RED
    }
    else {
        "#0602f5"; // BLUE
    }
}
This will work, but the IP Entities will still draw some attention on our graph, as they will be unaffected by the View. This is not a big problem here, but on a graph with several thousand Entities, this can make our data difficult to analyze. This is why adding a second binding to act as a catch-all can be useful.
Here is the Binding Test window of the previous binding:
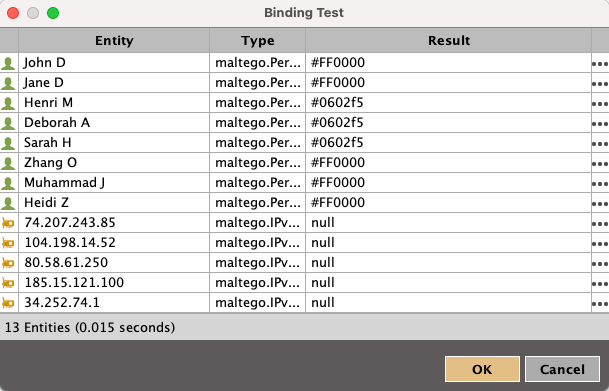
All of the Entities which result is null will be caught by the catch-all, as they do not have a value assigned yet. Here is what our catch-all look like:
"#808080"; // GREY
It is very important to make sure our second binding is below the first one, because bindings are executed in a descending order: The one on top of the pile is executed and the Entities to which it did not assign a value (size or color) are passed to the next binding for it to decide, and so on until there are no more Entities or bindings. This will reduce the visual impact of Entities that do not have an Age property by coloring them grey. To recapitulate, here are our two bindings, by order of execution:
if (hasProperty('age')) {
    if (getPropertyValue('age')>=18) {
        "#FF0000"; // RED
    }
    else {
        "#0602f5"; // BLUE
    }
}
"#808080"; // GREY
Since Views are about analyzing a graph at a glance, eliminating visual distractions is a must.
Dealing With Date Properties 🔗︎
One of the difficulties we run into when manipulating dates in Views is interpreting them as a date. Javascript Date objects allow for complex operations, including comparison. But by default, getPropertyValue() will load properties as a string of characters. Turning this value into a Date is up to you.
To do so, you first have to take into account that dates in Maltego can be stored in 3 different ways:
- As a string following a specific date format, such as VirusTotal File Entities that have four properties following the format YYYY-MM-DDTHH:MM:SSZ (ex: 2021-07-30T13:08:48Z)
- As a date property, which is the recommended property type to store dates, but not always used by Transform developers.
- As a timestamp, a common way to represent time in computer. It is the number of seconds passed between Epoch time (00:00:00 UTC on 1 January 1970) and the date you want to represent. For example, a recent timestamp could be 1674645967.
Let us see how to turn each of these formats into a Date object in JavaScript. Then, we will see an example of a View using a Date object.
Date Property 🔗︎
This is the easiest of the three possibilities as getPropertyValue() will load it as a Date object directly! Here is an example with the default BTC transaction Entity.
// parsing is automatically done, it's already a date
date_trans = getPropertyValue('ciphertrace.datetime');
Timestamp 🔗︎
This becomes a bit more difficult as we might need to modify the timestamp before creating our date object: JavaScript expects a timestamp that is precise up to the millisecond, but most timestamps are only precise up to the second. If this is the case (you can usually recognize this by the fact that it has 10 digits), we need to multiply the timestamp by 1000. Here is an example that works for Echosec Post Entities:
var creation_date = new Date(getPropertyValue('timeCreated')*1000);
String 🔗︎
This is possibly the trickiest situation, depending on the format of the date. If the format used to represent the date is a the one expected by this function (ISO 8601: YYYY-MM-DDTHH:mm:ss.sssZ), you simply have to call the constructor for Date, like in this example focusing on a VirusTotal file Entity:
var submission_date = Date.parse(getPropertyValue("firstSubmissionDate"));
If the date format in the property does not follow this format, the results may be inexact. If this is the case, it will be up to you to parse the date yourself and call the Date construct with each argument isolated. You can refer to the Mozilla documentation for more information on the constructor.
Once we have these different types of properties properly coded as Date object, we can use them in our Views. Here is an example of a View isolating Echosec Post Entities based on creation dates during a specific span of time:
// Set a first day and a last day for the period we want to inspect
var date_inf = new Date("2022-01-01T00:00:00Z");
var date_sup = new Date("2022-03-31T00:00:00Z");


if (isType("echosec.EchosecSocialPost")) {
    // Create the Date object from a timestamp
    var creation_date = new Date(getPropertyValue('timeCreated')*1000);

    // If statement with 2 conditions: creation_date posterior to date_inf
    // and creation_date anterior to date_sup.
    if (date_inf <= creation_date && creation_date <= date_sup) {
        // If it is the case, we color the post in red
        "#FF0000";
    }
    else {
        // If it is not the case, we color it in blue
        "#0000FF";
    }
} else {
    // If the Entity is not an Echosec post, we color it in grey
    "#808080";
}
Example of Views 🔗︎
Using The Color Binding To Represent Entities Age 🔗︎
Using the color binding to represent the age of an Entity is logical, considering that the size binding is capped between 50 and 500 while the number of different colors available in Maltego is far bigger than this. Granted, you and I will probably not be able to differentiate #FF0000 from #FF0001.
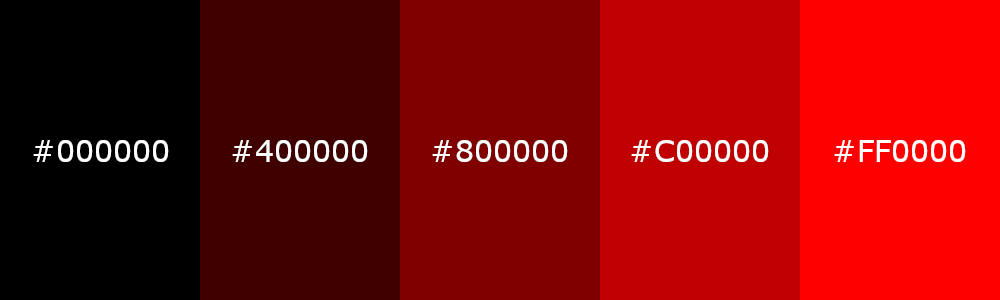
In this View, you can find an example of how a shade of a color can be used to show the age of an Entity, not only if it belongs to a particular timeframe. The idea behind this View is that an RGB triplet such as #FF0000 is an aggregation of 3 different number, each indicating how much of a color is included in this particular shade.
The two first character indicate the quantity of red, the following two the quantity of green and the last two the quantity of blue, hence the name RGB. Because of how this works, if we set the last four characters to zero and increase the first two characters, we obtain progressively brighter shades of red.
This binding changes the color of VirusTotal File Entities:
- Green if they have been submitted after the timeframe
- Blue if they have been submitted before
- Red if during
The more recently submitted the file, the brighter the shade of red.
This View could easily be adapted to other Entities by changing the strings highlighted in bold red and modifying the way the date is loaded depending on the format (as shown in the previous section).
// Isolate the type of Entity you want the view to highlight
if ( type == "maltego.virustotal.File"){

    // If no argument is given new Date will take the value of the current date
    // this can be a useful trick to have a moving timeframe, here is an example
    // to have a timeframe that will always cover the last 6 months
    var startdate = new Date()
    startdate.setMonth(startdate.getMonth() - 6);
    var enddate = new Date();

    // Choose the property you want to use as a reference.
    // Here we use the first time a VT sample was submitted
    // Date.parse gives us a timestamp matching the time in the property
    var submission_date = Date.parse(getPropertyValue("firstSubmissionDate"));

    // We get out the sample that do not fit the timeframe out of the way
    if (submission_date < startdate)
        {
        // Blue for the ones that are anterior to our timeframe
        var color = "#2200ff"; // BLUE
        }
        else if (submission_date > enddate)
        {
        // Green for the ones that are posterior to our timeframe
        var color = "#3cba44"; // GREEN
        }
        // This is where we elaborate the gradient
        else
        {
            // We need to divide our timeframe in 256 chunks
            // This substraction gives us the number of milliseconds that separates our 2 dates
            var difference = enddate - startdate;
            var quotient = Math.floor(difference/255);
            // We create an array with 256 entries
            var intervals = Array(256);
            // We fill it up with timestamps that represent the boundary for each chunk
            for (var i = 0; i < intervals.length-1; i++)
                {
                    intervals[i] = startdate + i*quotient
                }
            intervals[255] = enddate;

            // We iterate the array to see in which chunks the date of this Entity belongs
            var index_interval = -1;
            for (var i = 0; i < intervals.length-1; i++)
                {
                    if (submission_date < intervals[i])
                        {
                            index_interval = i;
                            break;
                        }
                }

                // Once we find the chunk, we take its index, convert it to hexadecimal and create the color.
                // The higher the index, the brighter the shade of red.
                color = "#" + index_interval.toString(16).toUpperCase() + "0000";
        }
        // We return the color that we previously stored in this variable
        color;
        }
else
    {
    // We color the other Entities in grey to avoid distracting us
    "#808080"; // GREY
    }
Highlighting Entities That Have A Specific Word In Their Properties 🔗︎
The following binding highlights Entities that have at least one of the specific keywords in any of their properties red. It can be easily repurposed by modifying the list of keywords in the first line of the code. If a string contains a double quote, you can enclose it in simple quote like so: ‘my “friend” Tyler’.
const keywords = ["ukraine", "war", "russia"];

var key_word_found = false;
for (let i = 0; i < keywords.length; i++) {
  if (propertiesContainCI(keywords[i])) {
    key_word_found = true;
    break;
  }
}

if (key_word_found) {
    "#FF0000";
} else {
    "#0000FF";
}
This is a crash course on how to create Views. While they are more time consuming and less practical than a simple text search, they are better suited for understanding a large dataset and are more versatile. Hopefully this is helpful in your future investigations!
Happy Investigating!